1. 2025-09-16
-
Memory Types: Stack/Heap
-
Value Type/Reference Type
-
Call by Value/Call by Reference
-
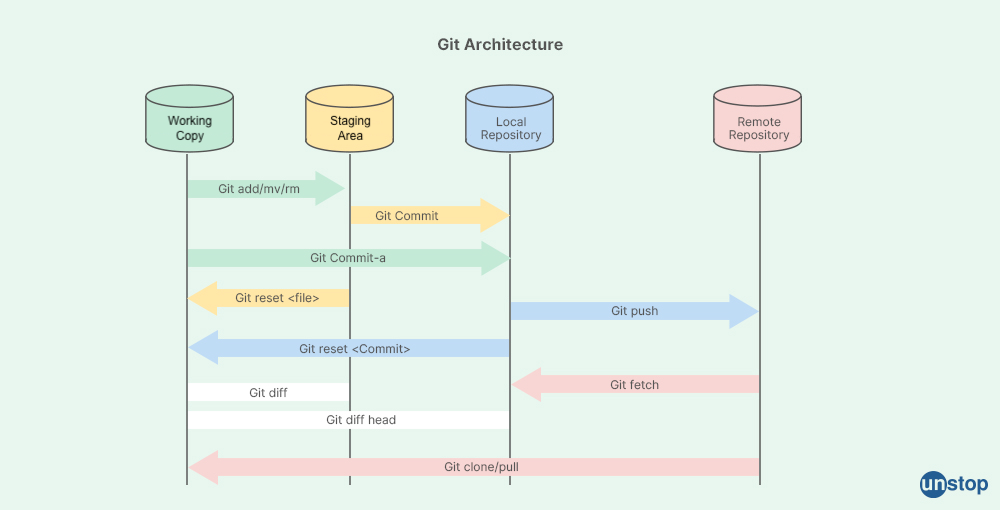
Distributed vs centralized version control
2. 2025-09-23
Testtermine:
-
2025-11-25 2025-12-02: 1. Test
-
2026-01-13: 2. Test
-
2026-04-21: 3. Test
-
2026-06-02: 4. Test (verschoben vom 9. auf 2. auf Wunsch der Klasse)
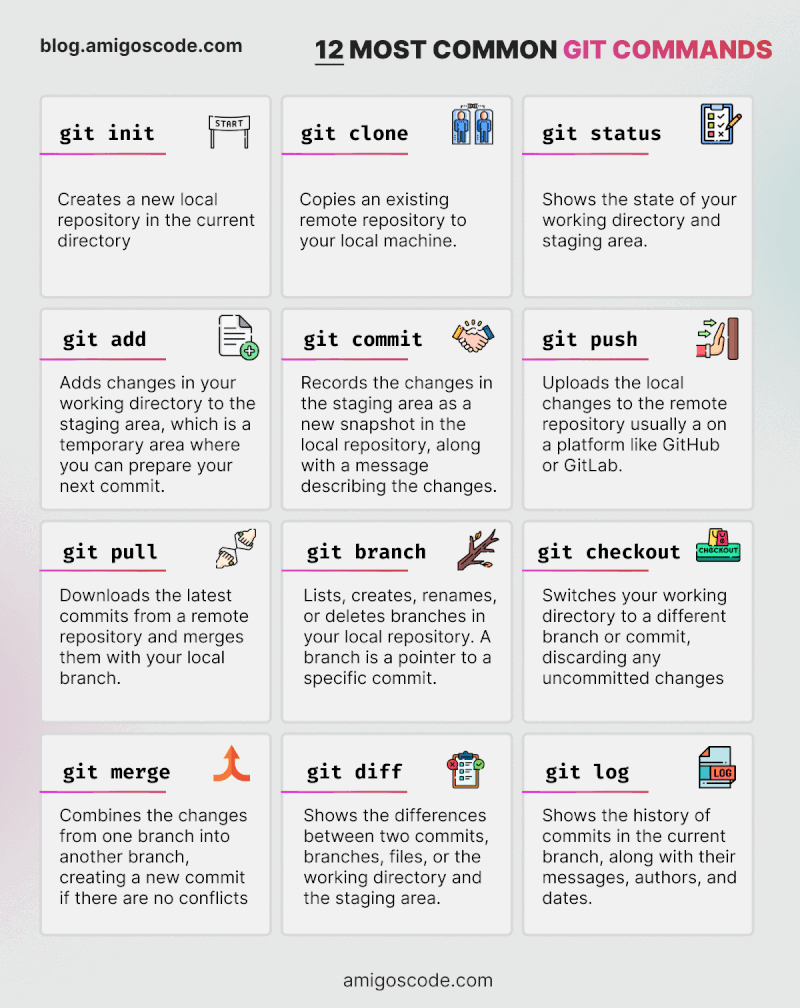
2.2. Einführung git
Fragen:
-
Was ist ein VCS?
-
Welche Probleme lösen VCS?
-
Unterschiede zwischen git und VCS wie zB SVN? (verteiltes vs zentrales VCS)
-
git - clients
-
git - workflow
Antwort
-
Unterschied zwischen git und GitHub/gitlab/bitbucket/…?
-
Wie erstellt man ein lokales Repository?
-
Was ist ein Repository?
-
Unterschied zwischem
rmundgit rm? -
Was ist der Unterschied zwischen
git commitundgit push?

5. 2025-10-xx
5.1. Branching
5.1.1. Types of Branches
-
Feature Branch
-
Bugfix Branch
-
Hotfix Branch (wie Bugfix nur dringender)
-
Main Branch (Release Branch)
Main Branch wurde früher Master Branch genannt
-
Develop Branch
5.1.2. Branching-Strategies
No-Flow


GitHub Flow
-
Vereinfachte Braching-Strategie: GitHub Flow (FH-Bielefeld)
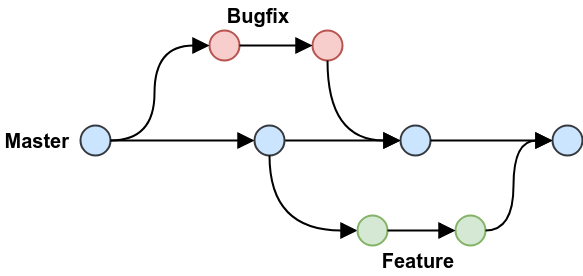 Figure 3. GitHub-Flow in Programster’s Blog
-
Fazit:
-
-
Git-Flow Workflow: Es gibt 2 Haupt-Branches (main, develop) und mehrere Neben-Branches (feature, release, hotfix)
-
GitHub Flow: Es gibt nur einen Haupt-Branch (main) und mehrere Neben-Branches (feature, hotfix)
6. 2025-11-05
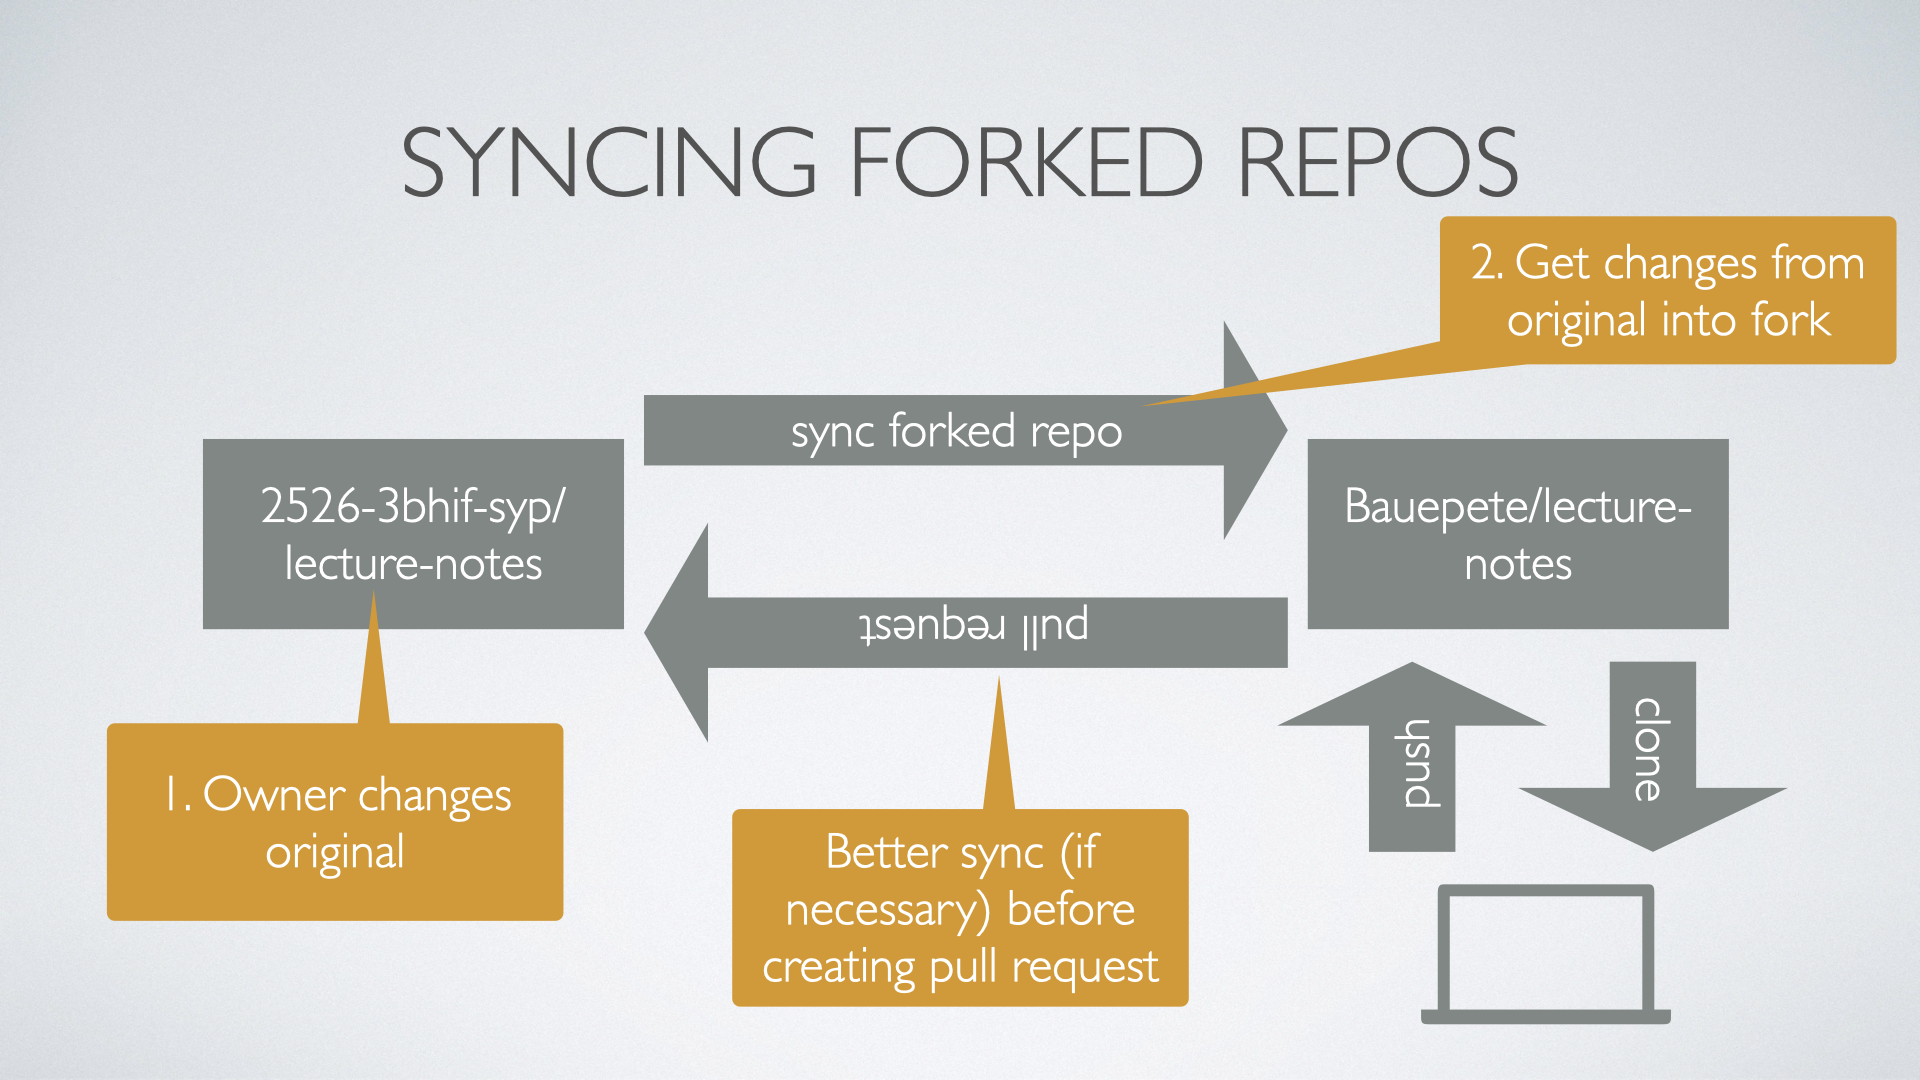
6.1. Forks and Pull Requests
In case somebody wants to contribute to a repo (owned by another person or organization) a fork of the original repo has to be done. The contributor can now change the forked repo without any limitations. When the contributor to get their changes back into the original repo they do a pull request, i.e., the contributor asks the owner to merge the changes back to the original repo.
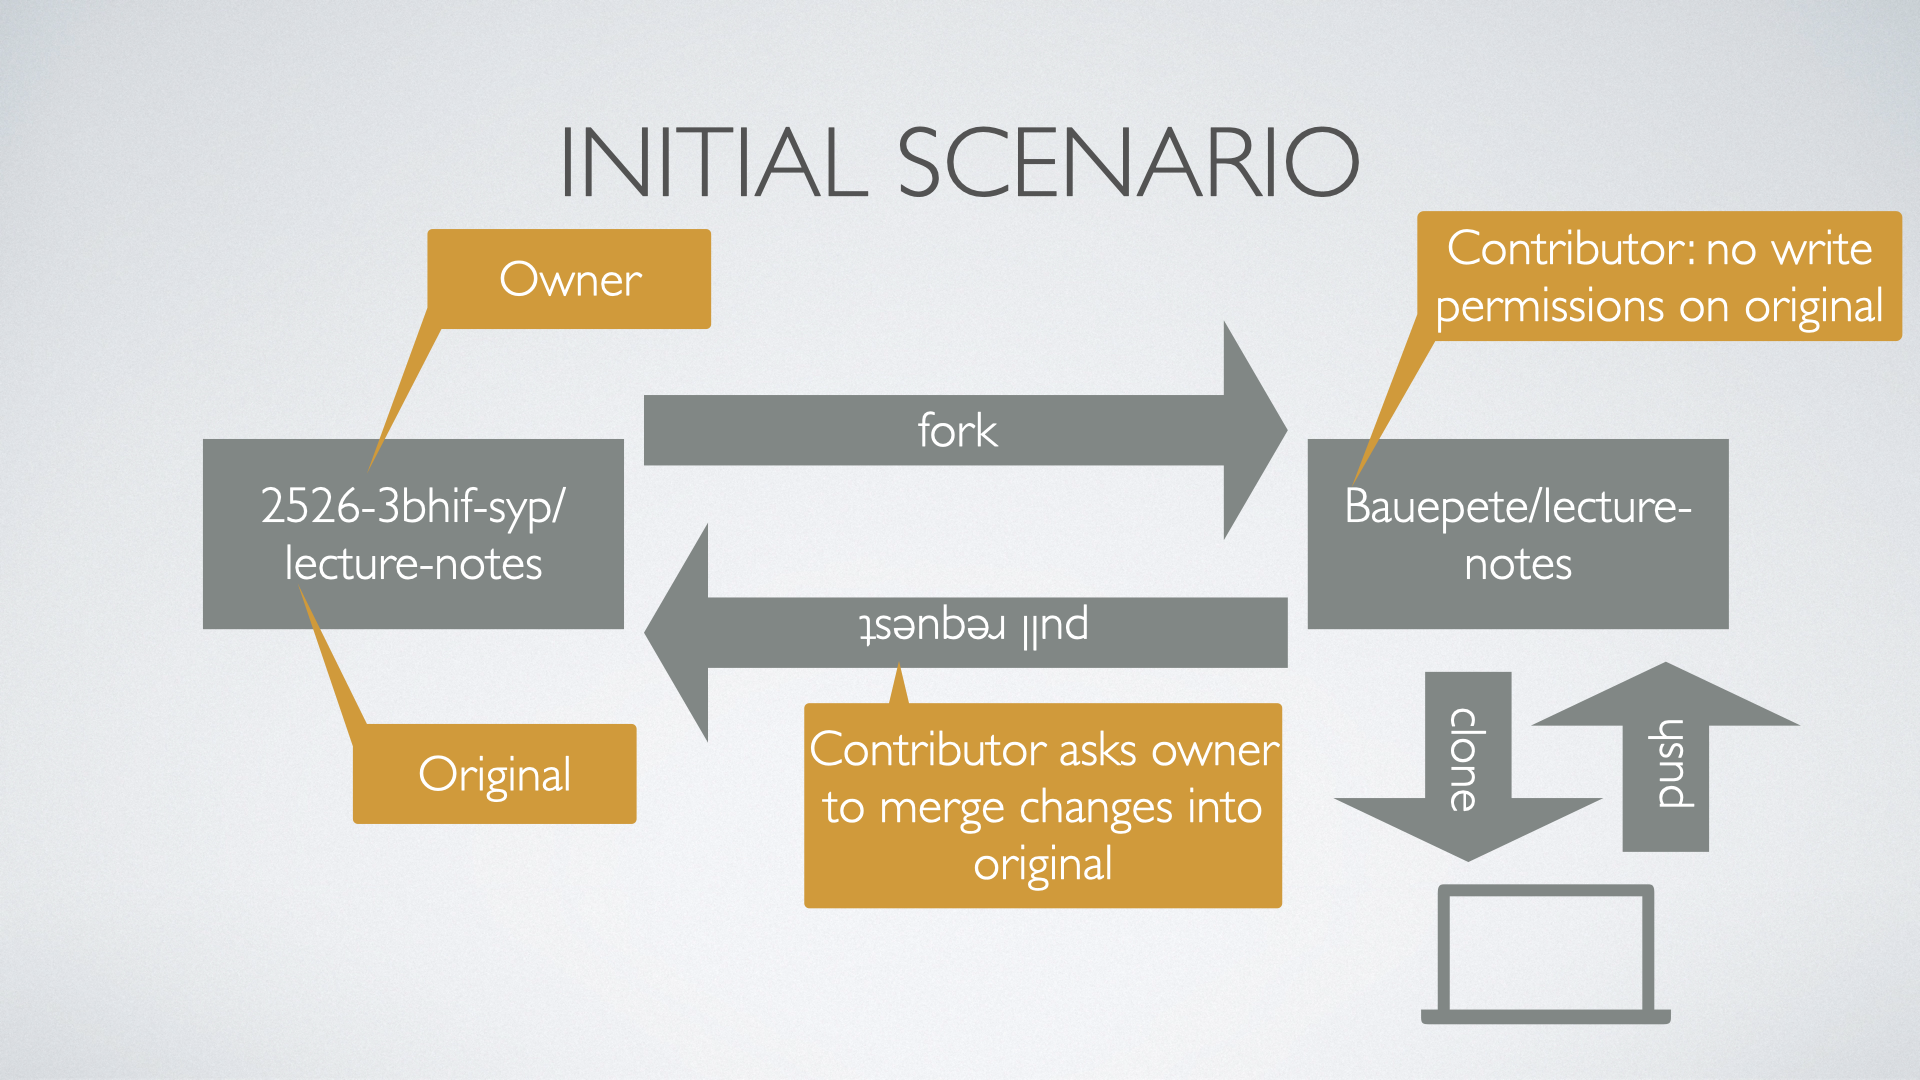
A fork of a repo can be seen as a smart copy of the original repository. Smart in this sense that the fork has a "backlink" to the original repo and is aware if the original has changed. As a contributor be aware if you ask for a pull request to have your fork synchronized with the original before creating a merge request.
6.2. Exercises
Work in pairs (called Student A and student B in the sequel) and accomplish the following tasks.
6.2.1. Simple Pull Request
-
A creates a repository with one text file
Readme.md. -
B forks it and clones it
-
B makes some changes to
Readme.mdcommits them and pushes them -
B creates a pull request to A to get the changes back to the original
Play around with the GitHub UI to get used to it. Reflect the different directions when to compare the pulled changes. Look closely on the arrows in the UI.
6.2.2. Sync A Given Fork
-
A does some changes to
Readme.md`commits and pushes -
B reloads their fork to get the info that the original has changed
-
B syncs the changes
Again try the different scenarios GitHub offers (direct syncing, comparing) and get acquainted to the UI and functionality.
6.2.3. Create a Pull Request from a Non-Synced Fork
-
A changes their repo and B reloads but does not sync!
-
B changes their repo (same file and line as A) and creates a pull request
See what happens. How to deal with merge conflicts? How to avoid these?
6.2.4. Pull Requests from a Non-Synced Fork But Using a Branch
-
A changes their repo and B reloads but does not sync!
-
B creates a new branch, changes the same file and line as A and creates a pull request
Look again what’s happening? Prepare for a discussion next week about how to deal best with pull requests and especially which discipline to establish to avoid pain.
8. 2025-11-19
8.1. Merging vs. Rebasing
8.1.2. Warum Rebasing?
-
Fazit:
-
Beim Rebasing werden die Commits des Branches in die Historie des Ziel-Branches eingefügt, als ob sie direkt dort erstellt worden wären. Dies führt zu einer geradlinigeren und saubereren Historie, kann jedoch die ursprüngliche Kontextinformation der Commits verändern.
-
Beim Merge hingegen bleibt die ursprüngliche Historie erhalten, was zu einer komplexeren Struktur führen kann, aber den Kontext bewahrt. Branches werden oft nach dem Merge gelöscht, um die Repository-Historie übersichtlich zu halten.
-
8.2. Exercises
Work in teams of two students, accomplish the tasks given below and document each step in an adoc or md file. Grading will be done by taking a sample of your documentation. We will especially check the clarity and understandability of your documentation. Think of your document that it could serve as an explanation for your younger sibling (or any other younger relative you have and like) to understand merging and rebasing by reading the documentation of the following two tasks.
8.2.1. Merging
-
Create a repository, add a file
onMain.mdand commit -
Create a branch
a-feature, check it out, create a fileonBranch.mdand commit -
Add some more lines to
onBranch.mdand commit -
View and document the history
-
Switch back to main branch and view and document the history as well as the content of your repository.
-
Reflect and document: are there differences between the two histories and contents and why?
-
Add some more lines to
onMain.mdand commit -
Repeat the last step a few times (at least twice)
-
Document the history again
-
Switch back to the feature branch
-
Merge the main branch into the feature branch
-
Document the history of the feature branch
8.2.2. Rebasing
Repeat the steps given in the last exercise but instead of merging the main branch into the feature branch rebase the feature branch on the last commit of the main branch. Of course, you need not document the histories etc. what you already did in the first example.
BUT document the history of the feature branch after rebasing. There should be a difference. Analyse and document it clearly.
9. 2025-12-03
Work on the exercises given on November 19. Keep the required documentation of your work. Maybe we need it to tie break unclear grading cases.
10. 2025-12-10
10.1. Forking vs. Templating
GitHub allows two ways to create a new repository based on the content of another:
-
Fork
-
Create from Templates
12. 2025-12-23
| Projekt | 1 | 2 | 3 | 4 | (5) |
|---|---|---|---|---|---|
DnD Character Builder. |
Marazovic(1) |
Mamsaleh(1) |
Music(1) |
Trkulja(1) |
Becer(1) |
Dnd MapGenerator |
Hadzic(1) |
Reitbauer(1) |
Grünzweil(1) |
Haider(1) |
Hasem(1) |
Vinylverwaltung |
Stoica(1) |
Dirnberger(1) |
Solomun(1) |
Darabos(1) |
Dürk(1) |
Flashcards |
Mostbauer(1) |
Brunner(1) |
Parzer(1) |
Yagci(1) |
|
Mobility Games Recommender |
Ibo(1) |
Kurtic(1) |
Maric(1) |
||
TripPlanner |
Hassani(1) |
Elgit(1) |
Gashi(1) |
||
BetterMindMaps |
Heissinger(1) |
Lohninger(1) |
James(1) |
Dönmez(1) |
Satybaldy(1) |
13. 2026-01-09
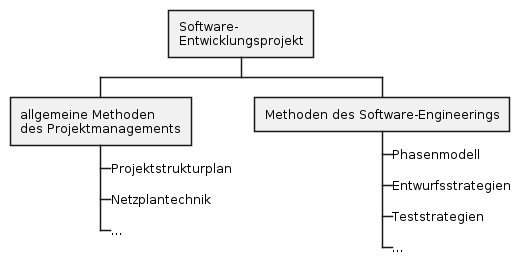
13.1. Software-Engineering
-
Buch Kap. 6, S.184ff
-
Vorgehensweise, um von der Realität zum "Modell" zu kommen
-
Top-down-Ansatz
-
Bottom-up-Ansatz
-
der evolutionäre Ansatz
-
-
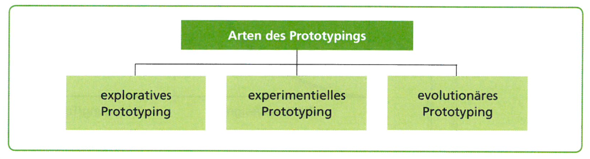
Arten des Prototypings
13.3. Prozessmodelle
Die Begriffe "Phasenmodell" und Prozessmodell" werden synonym als Bezeichnung für die Vorgehensanleitung bei Software-Entwicklungsprojekten verwendet.
-
Phasenmodell ist der ältere Begriff. Er betont die zeitlich klar strukturierte Abfolge von Projektabschnitten. Aus der Bezeichnung der Abschnitte, zB "Analyse", "Entwurf" …., leiten sich die zu erledigenden Aufgaben ab.
-
Prozessmodell ist der neuere Begriff. Er streicht die Tätigkeiten (oder Prozesse) während des Software-Entwicklungsprojekts heraus. Aktivitäten im Projekt sind nicht mehr an eine strenge chronologische Anordnung gebunden, sondern können in kurzen, iterativen Zyklen oder überlappend erfolgen.
-
Bekannte Prozessmodelle:
-
Wasserfallmodell
-
Spiralmodell nach Boehm
-
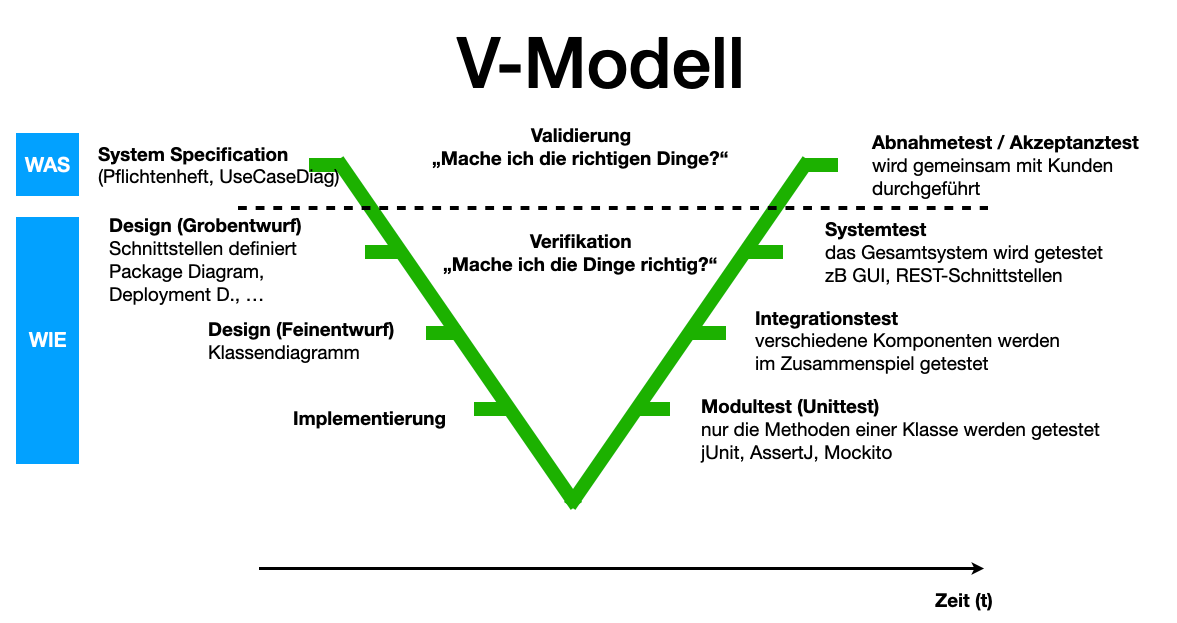
V-Modell
-
Grundsätzlich unterscheidet man:
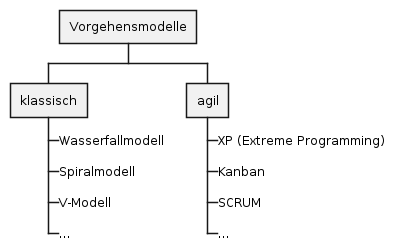
| Bei den klassischen Vorgehensmodellen legt man i.a. sehr früh die Anforderungen fest und entwirft das Softwareprodukt im Voraus, um es dann zu implementieren und zu testen. Änderungen sind nur schwer möglich. |
Darum wurden agile Vorgehensmodelle entwickelt, die flexibler auf Änderungen reagieren können.
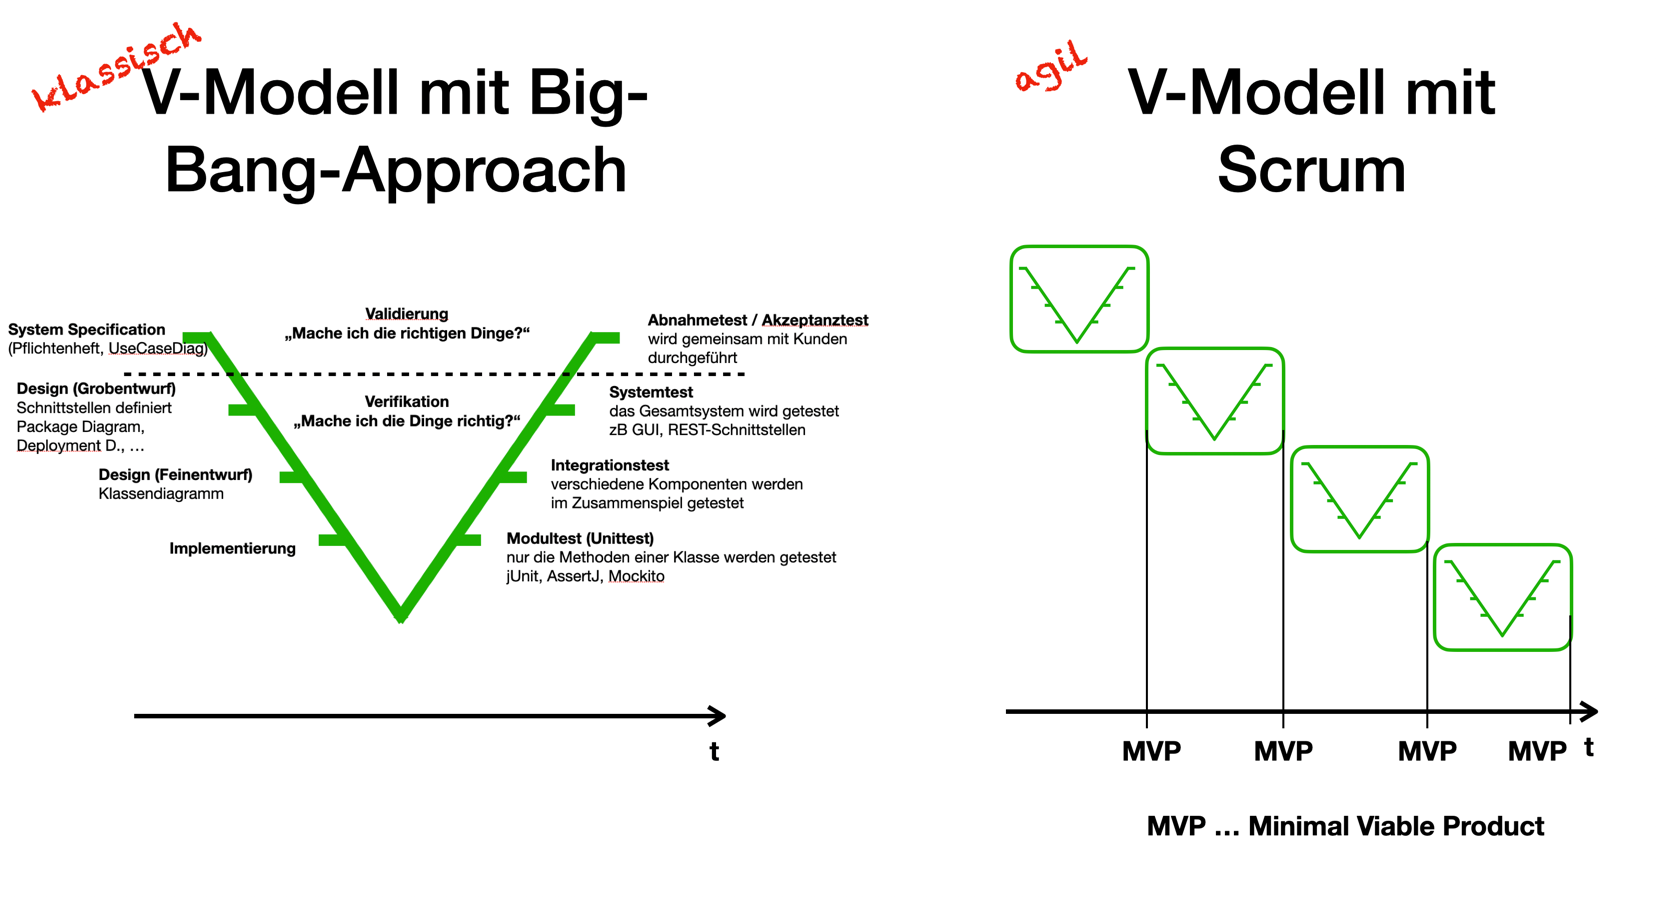
Die agilen Methoden besprechen wir später im Detail.
13.4. Systemanalyse und Anforderungen
Buch Kap. 7, S. 235ff
Da bei den klassischen Vorgehensmodellen die Anforderungen sehr früh festgelegt werden, ist eine sorgfältige Systemanalyse notwendig. Auch kann nun eine Systemspezifikation (Pflichtenheft) erstellt werden.
Spezifikation … technische Beschreibung
13.4.1. Anforderungsanalyse (Requirements Elicitation)
(siehe Buch für Details)
-
Interview
-
Fragebogen
-
Beobachtung
-
Selbstaufschreibung
-
Dokumentenanalyse
13.4.2. Pflichtenheft (!)
-
Ein Template steht hier bzw. hier als asciidoc zur Verfügung
Fragen:
-
Unterschied Lastenheft vs Pflichtenheft?
-
Gliederung eines Pflichtenhefts?
-
Unterschied funktionale vs nicht-funktionale Anforderungen (NFA)? Nennen Sie Beispiele.
-
Welche NFAs gibt es?
-
Was ist ein Mengengerüst?
-
Kreieren Sie ein Bsp für
-
Ausgangssituation
-
Istzustand
-
Problemstellung
-
Aufgabenstellung (Sollzustand)
-
Ziele
Erläutern Sie die Begriffe anhand Ihres Beispiels.
-
14. 2026-01-20
-
Persistenz: dauerhaft speichern von Daten. (Wenn die Daten den erstellenden Prozes überleben)
-
Transienz: flüchtig, temporär speichern von Daten
15. 2026-01-21
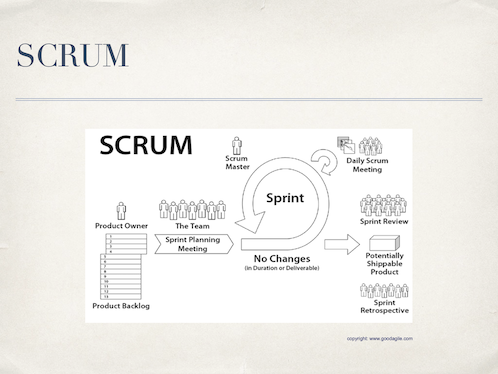
15.1. General Overview on Scrum
15.1.1. The Roles
-
Product Owner: the one who knows the product, has the best technical overview, drives the project, represents the customer’s view
-
Scrum Master: the one who is coaching the team, removing impediments fostering continuous improvement
-
Team: developers, testers, architects, …
15.1.2. The Most Important Artifacts
-
Product Backlog: Collection of user stories, prioritized and effort estimated; owned by the product owner
-
User Story:
-
A short story that describes a feature.
-
In the form: As a <role> I want to <feature> in order to <reason>
-
This form ensures that every feature described shows who is doing what with the system and why it is necessary to do it.
-
-
Sprint Backlog: Collection of tasks to be done during a sprint; owned by the team
-
Impediment Backlog: Collection of impediments; owned by the scrum master
15.1.3. Meetings and Folklore
-
Sprint: Period of time where features are implemented
-
Sprint planning meeting:
-
Done at the beginning of each sprint
-
Team defines which stories (based on the prios) to be done in the next sprint and refines them into clear tasks
-
Team and product owner refine the user stories which should come after this sprint
-
-
Daily scrum: aka Daily standup
-
Max 15 minutes every day where team stands together
-
Every team member tells what did I yesterday, what will I do today, are there any impediments?
-
Scrum master updates the team about the tasks in the impediment log
-
-
Sprint review
-
At the end of the sprint a shippable product is released and reviewed by the product owner and (ideally) the customer (product stake holders)
-
User stories are ticked off if ok
-
Progress and/or changes in the project are discussed
-
-
Sprint Retrospective: Team, scrum master and product owner reflect the last sprint: what was good, what was bad, how can we improve?
17. 2026-01-28
Review of system specs (Pflichtenheft) was done along one concrete example: DnD Character Builder
We discussed how to improve the Initial Situation (Ausgangssituation) by describing more details of the game. In general this section must contain enough information to make the reader understand the domain.
We found that the Actual State (Istzustand) must be improved by listing the already existing solutions available in the market. Further the feature set of the existing solutions should be briefly described. In general this section must contain enough information to make the reader understand how the problem can currently be tackled with existing solutions.
We found that the Problem (Problemstellung) must be improved by briefly adding shortcomings of the existing solution described in Actual State. This is also the general approach. In this section your way of thinking is Let me feel the pain.
We found that the functional requirements must not be one simple use case diagram. Although the diagram is important it is necessary to add a brief description of each requirement what it means in detail and why it is necessary. Think of the form of user stories: "As a <role> I want to <feature> in order to <reason>. The parts in the angular brackets have to be part of your description here.
General things discussed
-
Avoid general Bla-sentences, they only annoy the reader and make them skip lines and reading sloppy
-
If you use GenAI to make your text better readable YOU are the master of content!!
-
Generate a system spec for a DnD character builderBAD PROMPT!! You will only get Bla text which is immediately recognizable as being generated. If we get aware of such bullshit you are in DEEP TROUBLE!! -
Please explain the game DnD in 8 lines. Especially emphasize the terms Dungeon Master, Problems, Classes, Peoples, Characters. The explanation shall be understandable by absolute beginners.Good prompt under the assumption that you read the generated text and add more specific prompts to improve the text.
-
18. 2026-02-25
18.1. Product Backlog
User stories as we define them follow the form as given here:
# Story
As a <role> I want to <requirement> in order to <reason>.

# Acceptance Criteria
- <Criterion 1>
- <Criterion 2>
- <Criterion 3>
- <Criterion 4>
- ...

# Priority
<Low | Medium | High>

# Effort
<Story points>
18.1.1. Remarks on the Section Story
-
Role: Each user of a system has a role. This is to be specified here. Examples: Player, Admin, CEO, …
-
Requirement: The thing the user (in their role) wants to do with the system.
-
Reason: Why shall the role be able to do something?
Example for a Story: As a dungeon master I want to add a player in order to setup the player team for one game.
18.1.2. Remarks on the Section Acceptance Criteria
Each story must hold a set of acceptance criteria which help to verify whether the story is successfully implemented. Example:
-
The added players must be listed in the tab Players
-
All players which are added must get a notification that they are added to the game
-
All players added must see that they are in the waiting room
-
All players added must see the other players added to the game
-
The dungeon master must be marked as dungeon master
-
All other players (not added) must not see any details of the game
-
All other players must be able to request to be added to a specific game
-
…
We will collect our user stories as GitHub issues.
18.2. Exercise
Transform your system specification in a complete set of user stories. The stories to be documented as Github issues (each user story one issue). You have to bring the "Story", the "Acceptance Criteria" and the "Priority". The part "Effort" may be left blank (only the title to be provided).
19. 2026-03-04
19.1. How We Will Grade Your Project Progress
In this iteration the project team has … |
Score |
… not been able to demonstrate any new working software |
0 % |
… shown us something working but a bit less than expected or not what we agreed on |
30 % |
… one of the above but was able to explain their progress AND planning reflects their troubles clearly AND escalated the problem in time |
50 % |
… adequately delivered the features we agreed on |
70 % |
… made better progress than we expected |
80 % |
… made amazing progress with wonderful results |
100 % |
19.2. Effort Estimation
We will do the effort estimation by means of the so-called planning poker. For this every team member gets a set of seven cards, with the following content:
| Effort | Value |
|---|---|
No Effort |
0 |
Very Small Effort |
1 |
Small Effort |
2 |
Medium Effort |
3 |
Large Effort |
5 |
Very Large Effort |
8 |
Huge Effort |
13 |
Please prepare cards as required or print the ones given in the following link:
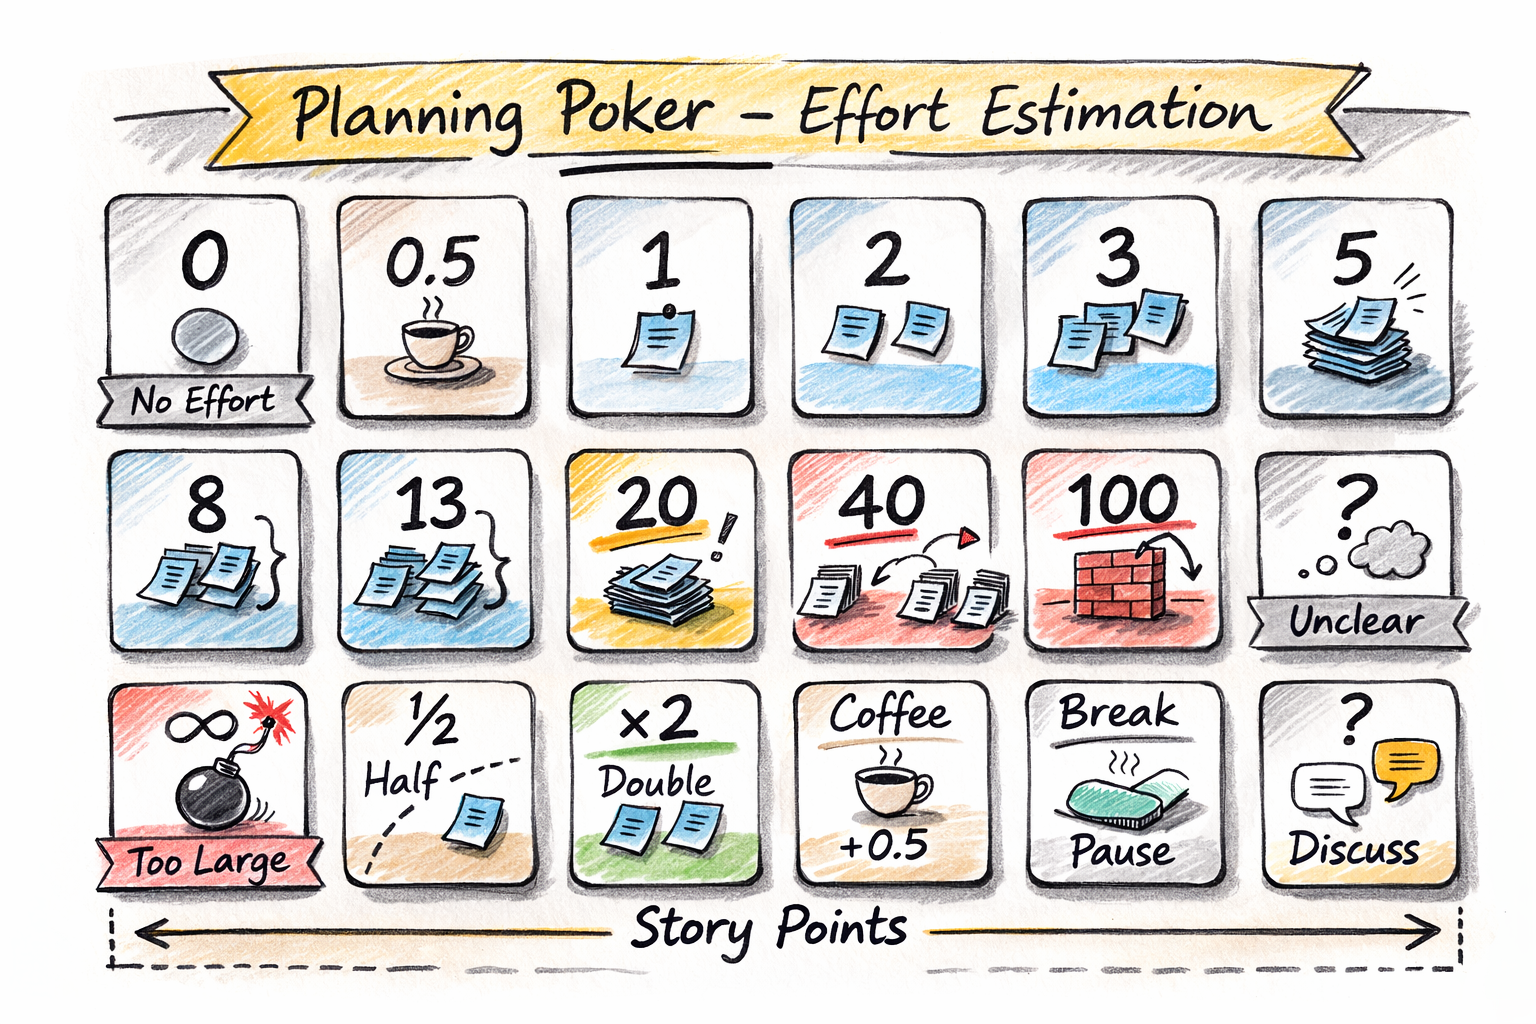
Then play the game as follows (moderation is done by the scrum master):
-
Every team member takes their set of cards
-
The team selects a story to be estimated (the first story should be one where all members agree that it is a really small story)
-
The product owner explains the story and the team asks to get a really good understanding of the story. Roughly sketch the tasks to be done.
-
Only if every team member has understood the story continue
-
Every team member selects the poker card which reflects the effort best (according to their personal opinion) and lays it on the table (back side up)
-
Only if every team member has their card back side up on the table continue
-
All team members flip their card
-
If all team members have chosen the same card the effort is documented in the product backlog and restarts the game with the next story
-
If team members have chosen different cards the estimation is not clear yet. Therefore the member with the highest and the one with the lowest estimation explain why they have chosen their estimation
-
Continue at step 5
Hints:
-
There is no direct relation between Story Points and time. Concrete example: if two team members (A and B) estimate a story to be of medium effort then A might have something like 4 hours in their mind and B something like 4 days. This does not harm as long as both have their personal "feeling" connected to "medium effort".
-
Related to the first hint: do not even try to connect story points to time. Not personally and, of course, not in the team. It is better to concentrate on the written labels ("low effort", "medium effort", …) when trying to pick up the proper poker card for your estimation.
-
The most important part during the planning poker is "discussion". Therefore, it is important to follow the planning poker procedure as close as possible. Although it may sound childish it is important that in case of non-distinct estimation results the highest and the lowest estimator give an explanation why they did so, followed up by a discussion how the others see that. This is all to get a common understanding in the team of what to be done to get the user story done.
-
Every now and then (after every second or third story estimation) go back to already estimated stories and see whether the estimation of the current story is sound the estimations of the ones which are already estimated.
23. 2026-04-07
23.1. Agentisches Programmieren in einer Sandbox
| Die ESP32-Workbench ist bei reinen Software-Projekten nicht sinnvoll. |
23.2. Zugriff auf die gh-User Stories über Claude
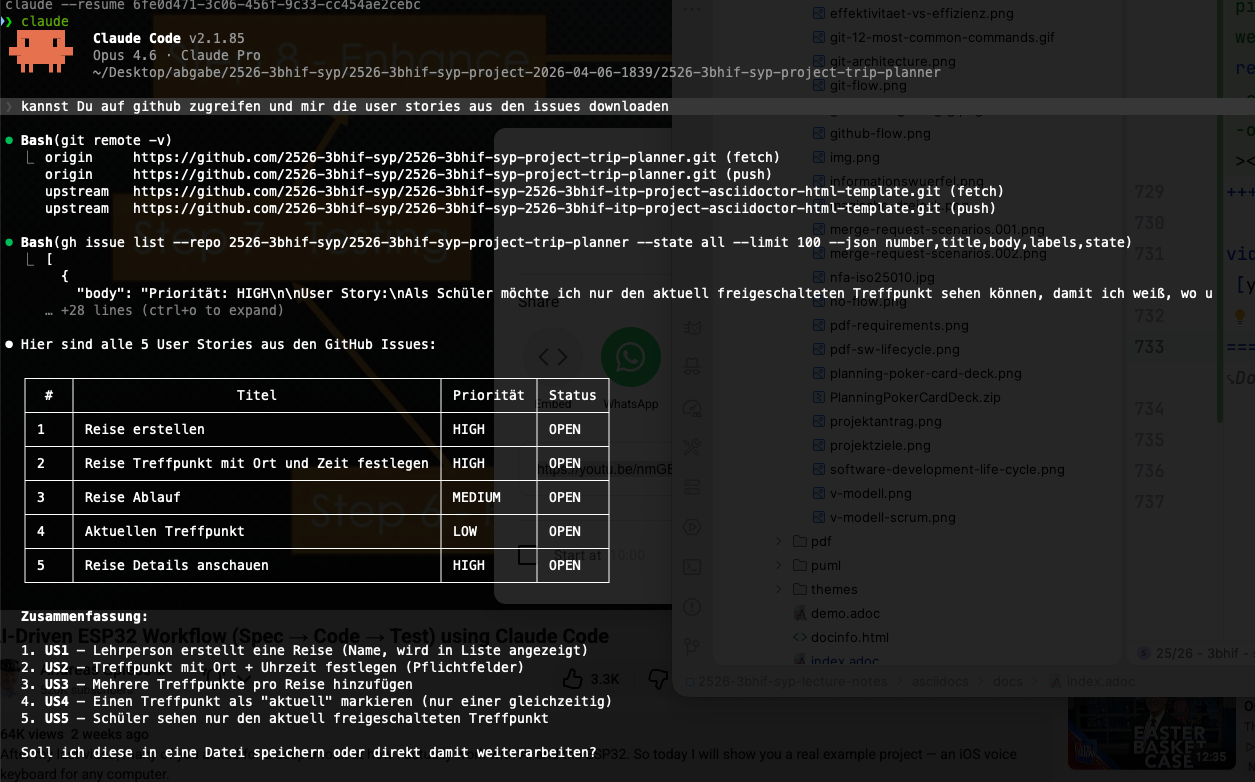
-
startet man claude im Projektverzeichnis, in dem der gh-Zugriff bereits konfiguriert ist, kann claude über die gh-cli auf die Issues des Projekts zugreifen?
-
Diese Issues können nun in die generierte Doku eingebunden werden, z.B. um die Akzeptanzkriterien der User Stories in die Doku - aks Grundlage für Tests - zu integrieren.
-
Somit können die Issues in gh erstellt werden und automatisiert übernommen werden.
23.3. Vorgaben für die JavaFX-Implementierung
-
Java 25 LTS
-
JavaFX 25
-
Build-Tool: maven
-
Hikari-CP als Connection Pool
-
JUnit 6 für Tests sowie assertj-core und assertj-db als matcher für die Tests (jeweils in der neuesten Version)
-
gedockerte postgres-db in der Version 18
-
keine fxml-files (die UI wird zur Gänze in Java-Code erstellt)
23.4. Dokumentation des Chat-Verlaufs
-
sämtliche prompts werden in einem file (zB chat.adoc) dokumentiert
-
zB
Chatverlauf
= Chat-Verlauf

== Prompts

. can you create a claude.md

. Please add the requirement, that we use javafx and the mvp pattern

. use as database postgres in a docker container

. kannst Du meine Prompts in chat.adoc eintragen?

. kannst Du auf github zugreifen und mir die user stories aus den issues downloaden

. include the first user story in the fsd-file and create the technical specs for implementing. We will discuss your proposal.

. use maven; java 25 LTS; JavaFX 25; JUnit 6 with assetj-core and assertj-db in the newest versions; HikariCP for connection pooling; Package prefix: at.htl.tripplanner; it is only a JavaFX-App at the moment

. don't use fxml. Code the UI in Java.

. please separate the functional (domain specs, business specs) and technical specs (architecture, design, implementation details). create for the first user story a "fsd.adoc"-file and a "technical-spec.adoc"-file. in a folder specifications. Don't use the file "pflichtenheft.adoc" anymore.

. Don't care about the asciidoc - folder. The asciidoc folder is solely for human-made docs.

. create tests according to the acceptance criterias of the user story.

. create the use-case diagram and the class diagram as plantuml in fsd.adoc

. when you create a commit, please write a meaningful commit message and include the issue number in the commit message. For example: "feat: Login-Seite #5".

. Halte dich bei den Commits an https://www.conventionalcommits.org/en/v1.0.0/

. trägst Du das nicht in Claude.md ein?

. kannst Du die Spec etwas allgemeiner gestalten? Anstelle von Lehrer -> Reiseleiter, Schüler -> Reisender, etc.?

. erstelle die javafx-app für die erste user story

. hatten wir nicht vereinbart, junit 6 zu verwenden -> https://docs.junit.org/6.0.3/api/

. assertj-core gibt es bereits in 3.27.7 und assertj-db in 3.0.2


. die Postgres db sollte 18 sein, der db-name: db und user: app mit password: app

. document how to start in README.md and create some demo data for the db

. trage die Änderungen in den docs ein
23.5. CLAUDE.md
-
Sehr wichtig ist die Konfiguration von CLAUD.md
-
Beispiel 1:
Details
# CLAUDE.md – Projektkontext ## Projektübersicht - **Projektname:** [Projektname hier eintragen] - **Beschreibung:** [Kurzbeschreibung des Projekts – was ist das Ziel?] - **Tech-Stack:** [z.B. React, Node.js, PostgreSQL, Docker] - **Sprache:** Deutsch (Dokumentation), Englisch (Code) --- ## Anforderungen & User Stories - User Stories sind als **GitHub Issues** erfasst - Issues verwenden folgende **Labels zur Priorisierung:** - `must-have` – Kernfunktionalität, zwingend erforderlich - `should-have` – wichtig, aber nicht kritisch für MVP - `could-have` – wünschenswert, wenn Zeit vorhanden - Issues können zusätzlich nach **Milestones** gruppiert sein (z.B. MVP, Phase 2) - Jedes Issue enthält eine User Story im Format: *„Als [Rolle] möchte ich [Funktion], damit [Nutzen]."* ### Zugriff auf Issues ```bash # Alle offenen Issues auflisten gh issue list # Issues nach Label filtern gh issue list --label "must-have" # Einzelnes Issue lesen gh issue view <NUMMER> # Issue nach Abschluss schließen gh issue close <NUMMER> --comment "Umgesetzt in Commit <SHA>" ``` --- ## Dokumentationsstruktur ``` docs/ ├── user-stories.md # Zusammenfassung aller User Stories (optional, Quelle: GitHub Issues) ├── fachspezifikation.md # WAS das System tun soll └── technische-spezifikation.md # WIE das System gebaut wird ``` ### Fachspezifikation (`docs/fachspezifikation.md`) Beschreibt die fachlichen Anforderungen ohne technische Details. Enthält: 1. **Einleitung** – Projektziel, Scope, Zielgruppen 2. **Glossar** – Fachbegriffe und Definitionen 3. **Akteure & Rollen** – Wer nutzt das System? 4. **Geschäftsprozesse** – Abläufe und Workflows 5. **Fachliche Regeln** – Validierungen, Berechnungen, Bedingungen 6. **Akzeptanzkriterien** – Pro User Story: wann gilt sie als erfüllt? 7. **Nicht-funktionale Anforderungen** – Performance, Verfügbarkeit, Datenschutz ### Technische Spezifikation (`docs/technische-spezifikation.md`) Beschreibt die technische Umsetzung. Enthält: 1. **Architekturübersicht** – Systemkomponenten und deren Zusammenspiel 2. **Tech-Stack** – Frameworks, Libraries, Tools mit Versionen 3. **Datenmodell** – Entitäten, Relationen, Datenbankschema 4. **API-Design** – Endpunkte, Request/Response-Formate 5. **Authentifizierung & Autorisierung** – Sicherheitskonzept 6. **Fehlerbehandlung** – Strategien und Error-Codes 7. **Deployment** – Infrastruktur, CI/CD, Environments 8. **Testing-Strategie** – Unit, Integration, E2E --- ## Arbeitsablauf (Workflow) ### Bei jeder neuen Aufgabe diese Reihenfolge einhalten: ``` 1. ISSUE LESEN → GitHub Issue lesen und verstehen → Akzeptanzkriterien identifizieren 2. FACHSPEZIFIKATION PRÜFEN/ERGÄNZEN → Gibt es bereits einen Abschnitt dazu? → Falls nein: Abschnitt erstellen → Falls ja: Auf Vollständigkeit prüfen, ggf. ergänzen 3. TECHNISCHE SPEZIFIKATION PRÜFEN/ERGÄNZEN → Architektur-Auswirkungen dokumentieren → Datenmodell erweitern falls nötig → API-Endpunkte definieren falls nötig 4. IMPLEMENTIEREN → Code schreiben gemäß Spezifikationen → Tests schreiben 5. ABSCHLIESSEN → Tests ausführen und sicherstellen, dass alles grün ist → Issue auf GitHub schließen mit Kommentar → Commit-Message referenziert Issue-Nummer (z.B. "feat: Login-Seite #5") ``` ### Wichtig: - **Niemals Code schreiben, bevor die Spezifikationen aktuell sind** - **Änderungen an der Architektur immer zuerst in der technischen Spezifikation dokumentieren** - **Bei Unklarheiten: nachfragen, nicht raten** --- ## Code-Konventionen ### Allgemein - Code und Kommentare auf **Englisch** - Dokumentation auf **Deutsch** - Keine auskommentierten Code-Blöcke committen - Jede Datei hat einen klaren, einzelnen Zweck (Single Responsibility) ### Commit-Messages Format: `<typ>: <beschreibung> #<issue-nummer>` Typen: - `feat` – neues Feature - `fix` – Bugfix - `docs` – Dokumentation - `refactor` – Code-Umbau ohne Funktionsänderung - `test` – Tests hinzufügen/ändern - `chore` – Build, Dependencies, Konfiguration Beispiel: `feat: implement user authentication #12` ### Branching - `main` – stabiler, deploybarer Stand - `dev` – Entwicklungsbranch - Feature-Branches: `feature/<issue-nummer>-<kurzbeschreibung>` - Beispiel: `feature/12-user-authentication` --- ## Testing - Jedes Feature braucht Tests - Tests vor dem Committen ausführen - Testbefehle: [hier eintragen, z.B. `npm test`, `pytest`] --- ## Projektspezifische Regeln <!-- Hier eigene Regeln ergänzen, z.B.: --> <!-- - Alle API-Responses folgen dem Format { data, error, meta } --> <!-- - Datenbankmigrationen werden mit [Tool] verwaltet --> <!-- - Environment-Variablen werden in .env.example dokumentiert --> --- ## Schnellreferenz – Häufige Befehle ```bash # Projekt starten [hier eintragen, z.B. npm run dev] # Tests ausführen [hier eintragen, z.B. npm test] # Linting [hier eintragen, z.B. npm run lint] # Build [hier eintragen, z.B. npm run build] ``` -
Beispiel 2
Details
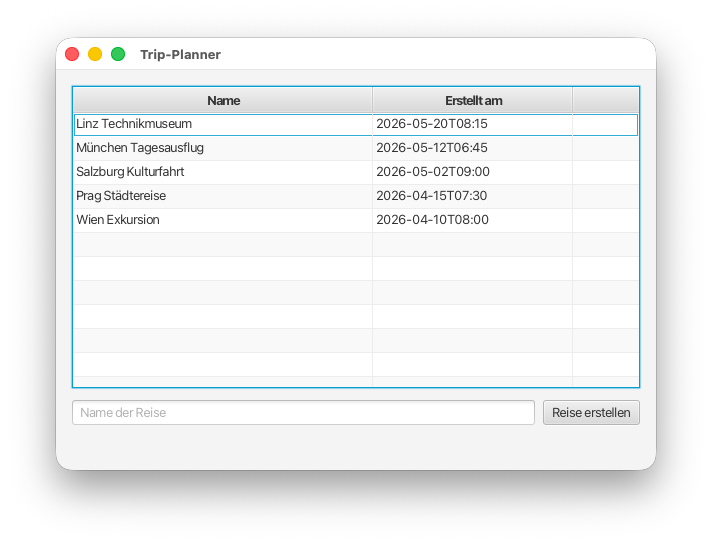
# Trip-Planner

## Project Overview

School trip planning JavaFX desktop application for HTL Leonding. Teachers create trips with multiple meeting points (time + location); students see only the currently active meeting point.

## Repository Structure

- `asciidocs/` — AsciiDoc documentation (source)
  - `docs/` — main docs (pflichtenheft.adoc, docinfo.html)
  - `slides/` — presentation slides
  - `scripts/` — Docker-based conversion scripts (do not modify)
- `config.sh` — build config (input path, output path, slides toggle)
- `publish.sh` / `local-convert.sh` — local doc build scripts
- `.github/workflows/docs.yaml` — CI: builds AsciiDoc and deploys to `gh-pages` branch

## Documentation

- Written in AsciiDoc (`.adoc` files)
- Converted to HTML via Docker (`asciidocs/scripts/docker-convert.sh`)
- Published to GitHub Pages on push to `main` (only when `asciidocs/**` changes)
- Output goes to `dist/` (gitignored)

## Commands

- Build docs locally: `./local-convert.sh`
- Publish docs: `./publish.sh`

## Tech Stack

- **Java**: 25 LTS
- **UI Framework**: JavaFX 25
- **Build Tool**: Maven
- **Architecture Pattern**: MVP (Model-View-Presenter)
- **Database**: PostgreSQL 18 (Docker container, DB-Name: `db`, User: `app`, Passwort: `app`)
- **Connection Pool**: HikariCP
- **Testing**: JUnit 6, AssertJ Core, AssertJ-DB
- **Package Prefix**: `at.htl.tripplanner`

## Conventions

- Documentation language: German
- Branch: `main` is the primary branch, `gh-pages` for published docs
- Commits: follow [Conventional Commits](https://www.conventionalcommits.org/en/v1.0.0/) with GitHub issue reference, e.g. `feat: Reise erstellen #1`
- UI: JavaFX views coded in Java (no FXML)
- `asciidocs/` is for human-made docs only — generated specs go in `specifications/`
23.8. Erstellen von Ascidoc-Files
-
Beachte: Ergänze die adoc-Files mit geeigneten Präamble-Eintragen zB :toc
23.10. Issue Templates konfigurieren
-
Gehe in deinem Repository auf den Reiter Settings.
-
Scrolle im Bereich General nach unten zum Abschnitt Features.
-
Klicke neben "Issues" auf den Button Set up templates.
-
Wähle Add template und suche dir einen Typ aus (z. B. Bug Report oder Feature Request).
-
Klicke auf Preview and edit, um den Text und die Standard-Labels anzupassen.
-
Klicke oben rechts auf Propose changes, um die Dateien zu speichern.
23.10.1. User Story Template
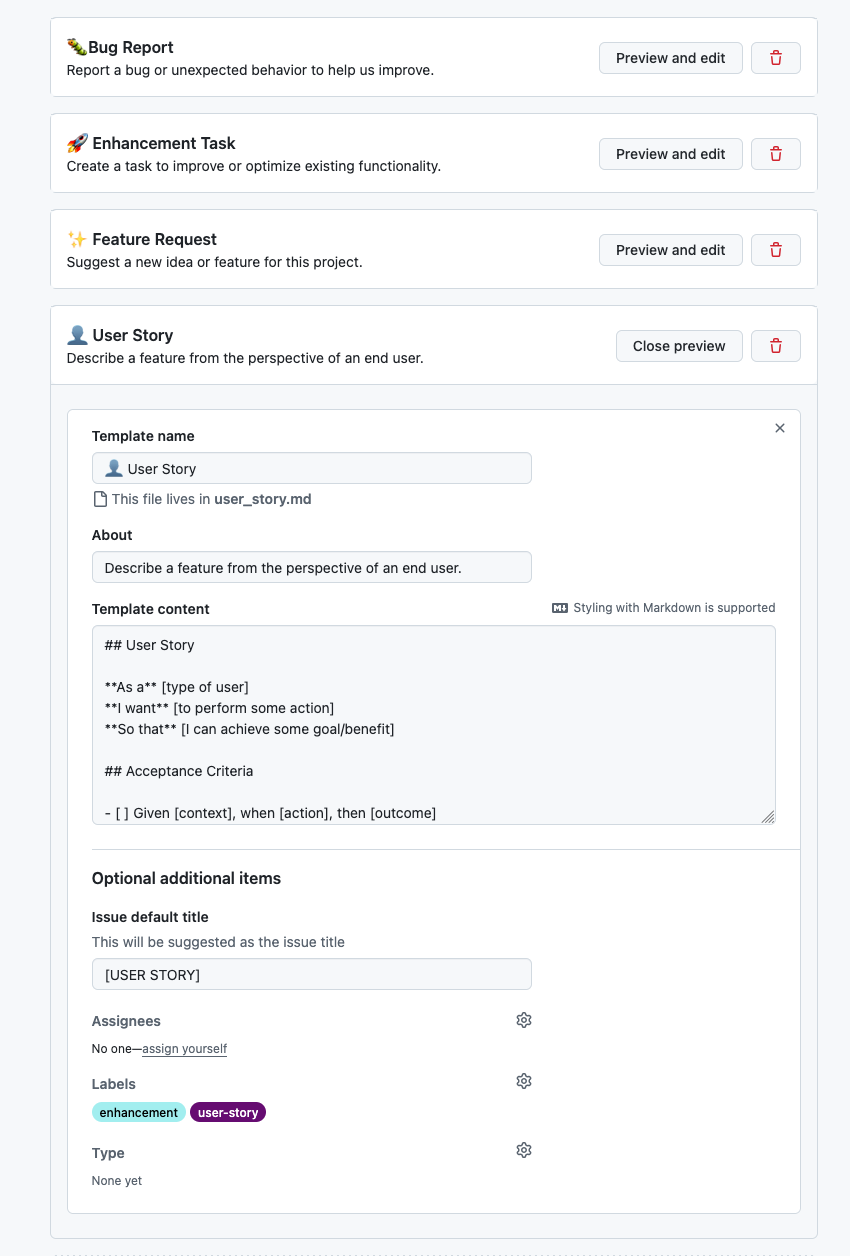
## User Story

**As a** [type of user]
**I want** [to perform some action]
**So that** [I can achieve some goal/benefit]

## Acceptance Criteria

- [ ] Given [context], when [action], then [outcome]
- [ ] Given [context], when [action], then [outcome]
23.10.2. Feature Request Template
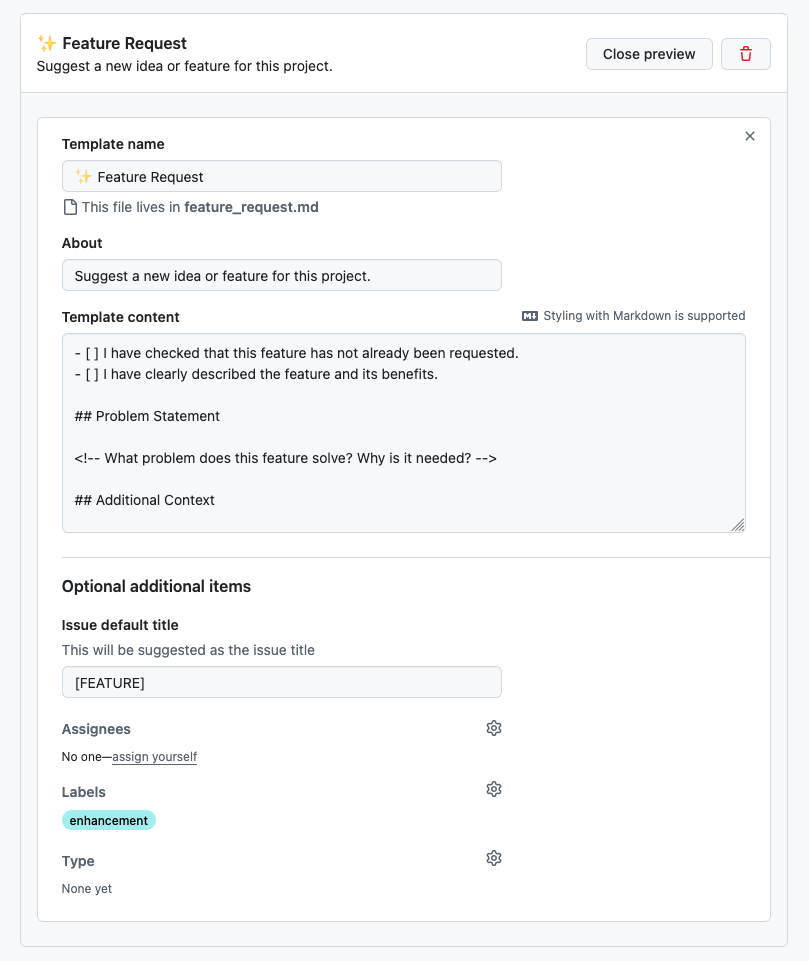
- [ ] I have checked that this feature has not already been requested.
- [ ] I have clearly described the feature and its benefits.

## Problem Statement

<!-- What problem does this feature solve? Why is it needed? -->

## Additional Context

<!-- Add any other context, mockups, or references to similar features in other tools. -->
23.10.3. Enhancement Task Template
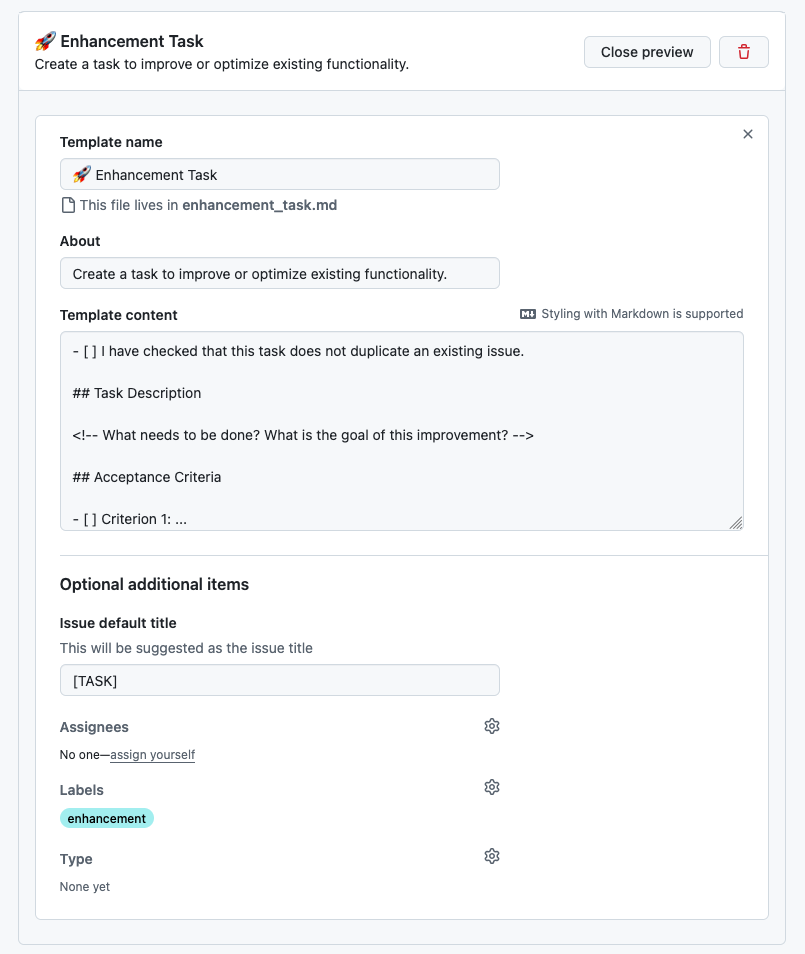
- [ ] I have checked that this task does not duplicate an existing issue.

## Task Description

<!-- What needs to be done? What is the goal of this improvement? -->

## Acceptance Criteria

- [ ] Criterion 1: ...
- [ ] Criterion 2: ...

## Related Issues

<!-- Link any related issues or PRs. -->
23.10.4. Bug Report Template
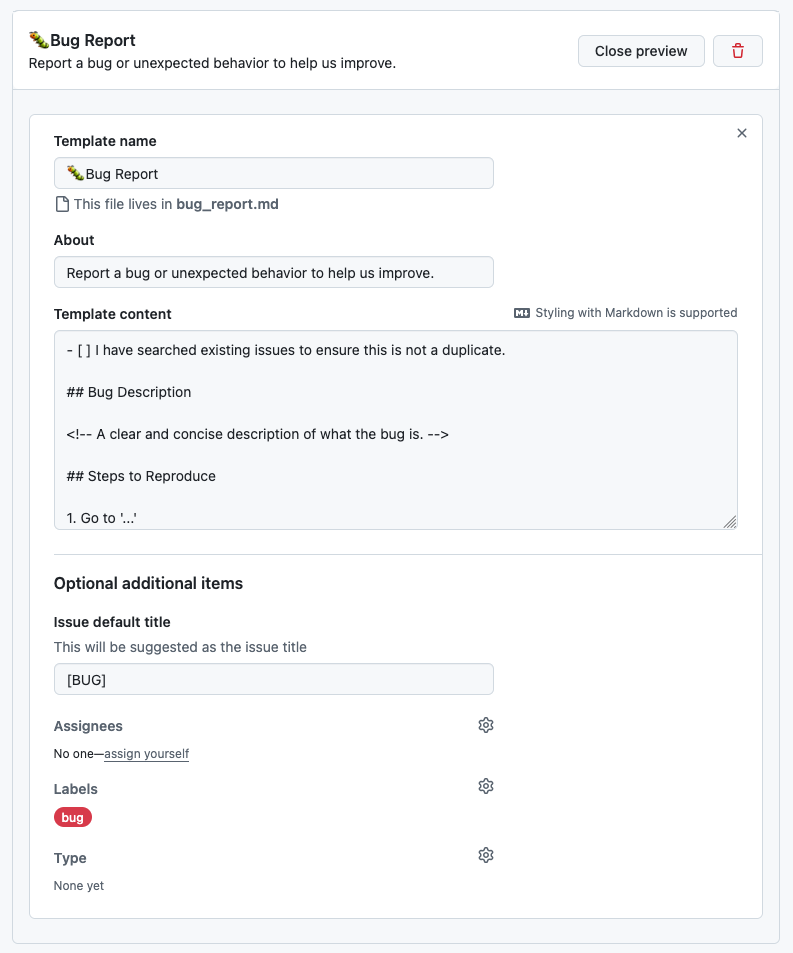
- [ ] I have searched existing issues to ensure this is not a duplicate.

## Bug Description

<!-- A clear and concise description of what the bug is. -->

## Steps to Reproduce

1. Go to '...'
2. Click on '...'
3. See error

- [ ] Is this reproducible every time?

## Expected Behavior

<!-- What did you expect to happen? -->

## Actual Behavior

<!-- What actually happened? Include error messages if any. -->

## Environment

- **Component:** [e.g. Mahnwesen, Rechnungen]
- **OS:** [e.g. Windows 11, macOS]
- **Browser:** [e.g. Chrome, Firefox]

## Screenshots / Logs

<!-- If applicable, add screenshots or log output to help explain the problem. -->
24. 2026-04-14
-
Teststoff
-
Docker
-
Scrum
-
UML (Datenmodellierung nur CLD und OD)
-
V-Modell (klassische Vorgehensmodelle)
-
git
-
Fragenkatalog und Lecture Notes
-
24.1. openSpec
24.1.1. Projektkontexte
Greenfield
-
Neues Projekt
-
Keine Altlasten
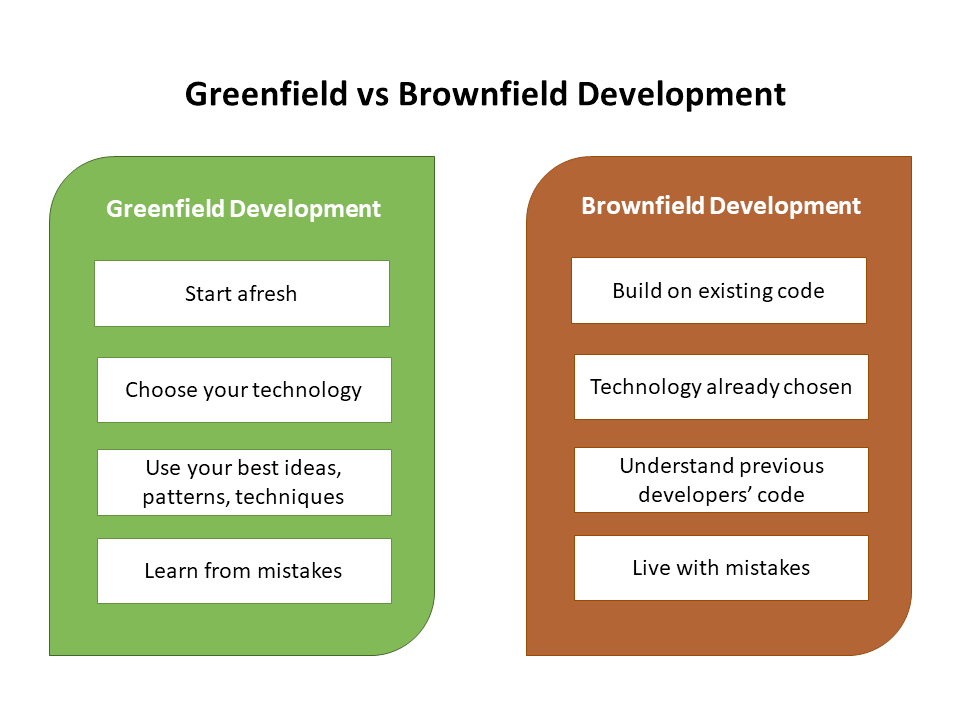
Wichtig für LLM: Kontext unterscheidet sich stark
| Anbei erhalten Sie die (sehr detaillierten) Vorgaben lt. Prof. Aberger [download] student_fsd_package.zip herunterladen (.zip). Sie können aber auch gerne eine einfachere Vorgehensweise wählen: Vorgehen nach openspec.dev |
24.2. Continuation Prompt im agentischen Programmieren
zB nach Erstellen einer GUI in stitch kann man "Give me a continuation prompt" eingeben.
Dieser Prompt wird im Verzeichnis continuation gespeichert und kann später wiederverwendet werden, um die GUI weiterzuentwickeln.
Mit /clear den Context löschen und ggf @continuation/gui.md wieder einlesen.
Man muss bei Änderungen zunächst einen change request nach openspec erstellen, damit die Änderungen in der Spezifikation dokumentiert sind. Danach kann man die Änderungen vornehmen und den Continuation Prompt ausführen, um die Änderungen umzusetzen.
25. 2026-04-28
25.1. MQTT
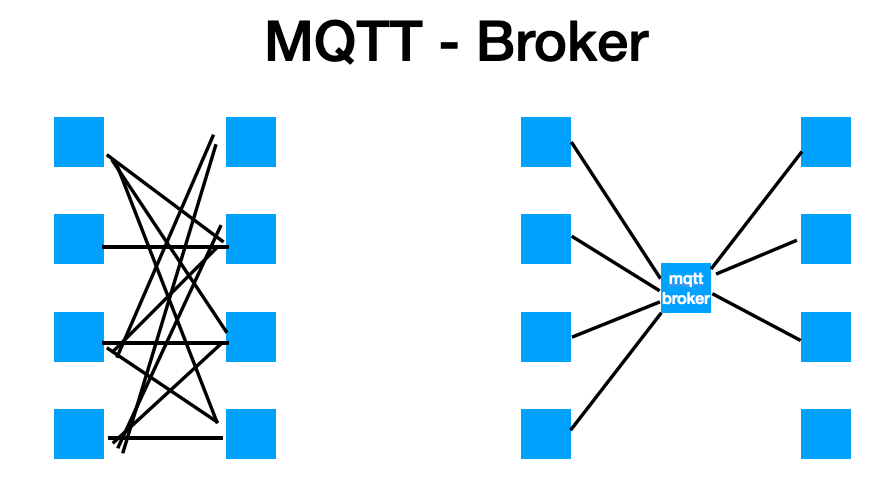
-
Broker
-
synchron / asynchron
-
QoS (Quality of Service)
-
Retained Messages
-
Publish-Subscribe-Pattern vs. ObserverPattern
Merkmal Observer Pub-Sub Kopplung
direkt (tight)
indirekt (loose)
Vermittler
keiner
Broker / Event Bus
Kennen sich?
ja
nein
Timing
meist synchron
meist asynchron
Scope
ein Prozess
auch über Prozesse/Netzwerk
Skalierbarkeit
begrenzt
hoch
Beispiele
Java Swing Listeners,
addEventListenerKafka, RabbitMQ, Redis Pub/Sub
-
Was ist ein Protokoll?
-
http
-
…
-
26. 2026-05-12
27. 2026-05-26
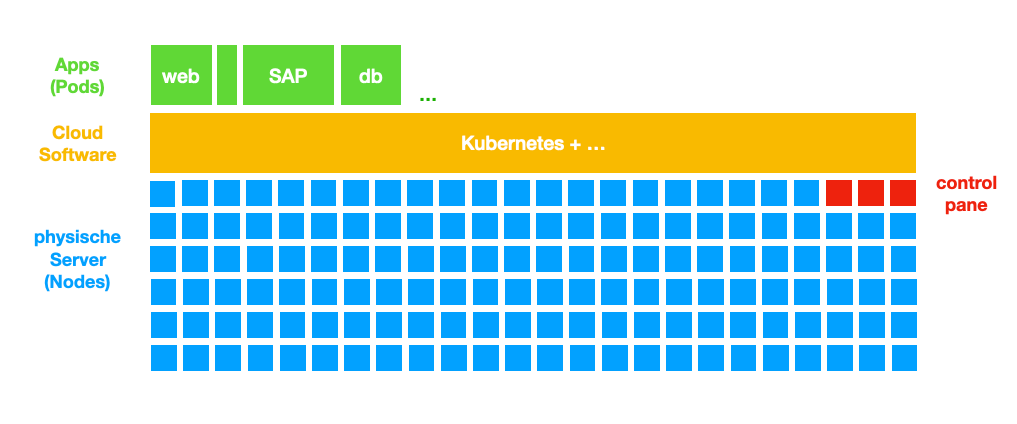
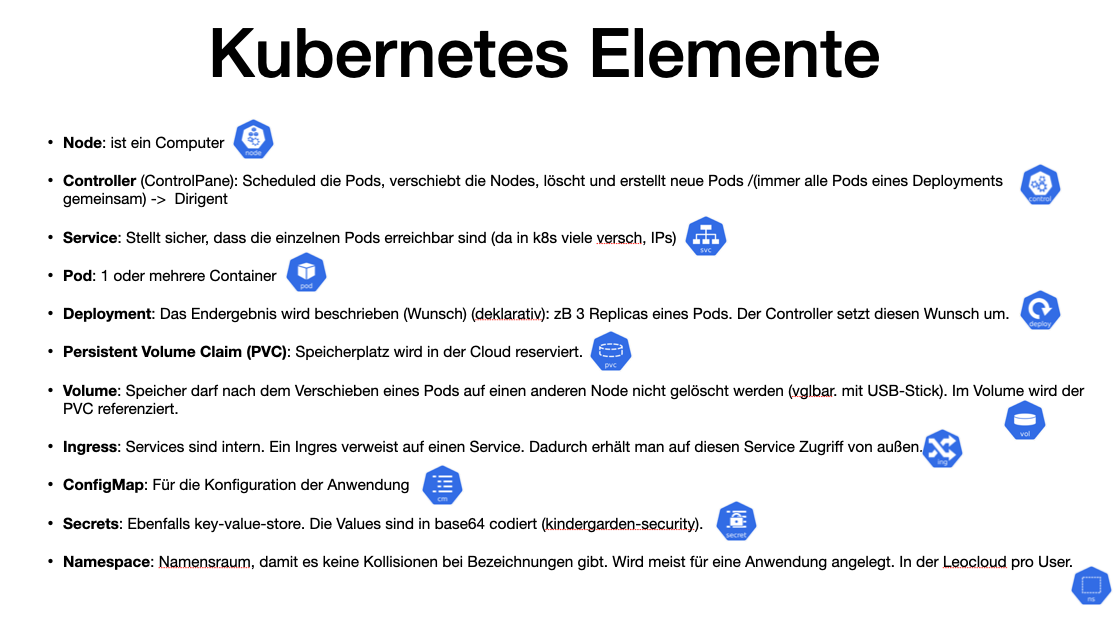
27.1. k8s - by Haider Nico
27.1.1. Unterschied einer VM zu k8s
-
k8s:
-
jede Maschine = 1 Node
-
k8s trennt die Nodes von Apps/Pods
-
-
Proxmox:
-
virtueller Server ⇒ Speicher abhängig
-
27.1.2. warum k8s
-
k8s abstrahiert die Pods von den Nodes (Pod ist egal auf welcher Node er läuft)
-
k8s deployment ist deklarativ (wie z.B. SQL), es beschreibt wie es aussehen soll und k8s führt die nötigen Prozesse aus
-
k8s löst das Problem zu geringer Ressourcen → es ist skalierbar
-
Skalierbarkeit:
-
wenn Anforderungen an das System sich verändern, kann die Leistungsfähigkeit aufrecht erhalten werden ohne das System ändern zu müssen → Last-Verteilung
-

29. 2026-06-02
29.2. AI-Demo
-
Erstellen eines einfachen REST-Endpoints mit
-
openSpec
-
claude-cli
-
Das Demoprojekt befindet sich in "labs/ai-demo"
-
Projekt starten:
cd docker
docker compose up -d./mvnw clean quarkus:devDann mit Browser auf api zugreifen: http://localhost:8080/api/vehicles
29.2.1. Token sparen
-
Bezeichner immer unter Anführungszeichen setzen
-
Caveman verwenden
-
Continuation Prompts createn (in Verzeichnis
continuations/) und refreshen.
29.2.2. openspec
| OpenSpec-Befehl | Erklärung |
|---|---|
|
Analysiert den aktuellen Projektzustand und sammelt Kontext, Anforderungen und bestehende Artefakte. |
|
Erstellt auf Basis der Analyse einen Änderungsvorschlag (Spec-Delta) mit geplanter Umsetzung. |
|
Setzt den freigegebenen Vorschlag um und überführt die geplanten Änderungen in den Arbeitsstand. |
|
Synchronisiert den aktuellen Stand zwischen Spezifikation und Umsetzung, damit beides konsistent bleibt. |
|
Archiviert abgeschlossene Änderungen, um den Change-Verlauf sauber und nachvollziehbar zu halten. |
30. 2026-06-09
30.1. Tutorial: Erstellung eines Backends mit openSpec und AI-Agenten
Dieses Tutorial beschreibt die schrittweise Durchführung eines Software-Entwicklungs-Projekts im Verzeichnis labs/ai-demo unter der Verwendung des Frameworks openSpec und eines AI-Agenten (wie z. B. Claude Code oder Antigravity).
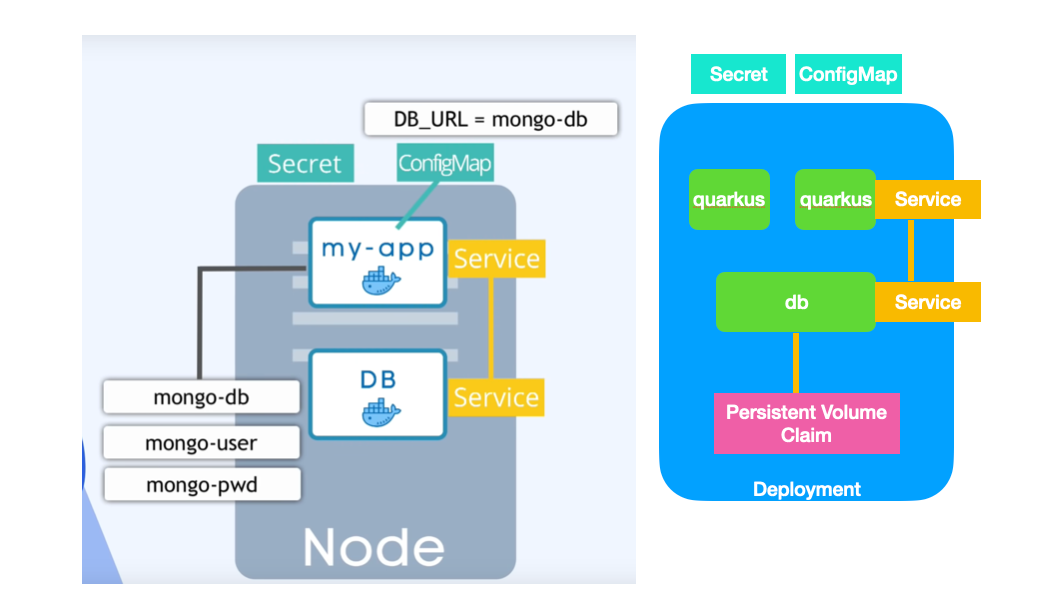
Ziel ist die Erstellung einer Quarkus-Applikation zur Verwaltung von Fahrzeugen (CRUD-Operationen) mit einer PostgreSQL-Datenbank.
30.1.1. Konzept & Workflow
Bei der Entwicklung mit AI-Agenten verliert das LLM nach jeder Session den Kontext. openSpec löst dieses Problem, indem funktionale Anforderungen direkt im Repository persistiert werden.
Dabei wird die Software konsequent in kleinen Schritten (Inkrementen) entwickelt. Jedes dieser Inkremente wird vorher sauber spezifiziert, bevor mit der eigentlichen Implementierung begonnen wird. So können Vereinbarungen aus dem Scrum-Entwicklungsprozess (wie z. B. die Definition of Done (DoD)) exakt eingehalten werden. Dieser Ansatz ermöglicht eine klare Strukturierung des Entwicklungsprozesses und stellt sicher, dass alle Beteiligten – Mensch wie Maschine – ein gemeinsames Verständnis der Anforderungen und Ziele haben, noch bevor Code geschrieben wird.
Für dieses Projekt nutzen wir folgendes Setup:
-
Spezifikationen (Specs): Alle funktionalen und technischen Spezifikationen werden im
.md-Format (Markdown) verfasst. -
Chat-Verlauf: Alle Prompts und Interaktionen werden in der Datei
labs/ai-demo/chat.md(oderchat.adoc) dokumentiert.
Sämtliche Eingaben werden links im AI-Agenten-Fenster durchgeführt. Rechts kann man sich die Ergebnisse in einem beliebigen Editor bzw. einer IDE ansehen. Wir verwenden JetBrains, da es eine sehr gute Unterstützung bietet:
-
für Datenbanken (Zugriff auf DB und Erstellung von ER-Diagrammen)
-
für den Zugriff auf Endpoints (z. B. REST, GraphQL, …) mit dem "JetBrains HTTP-Client"
-
zur Ausführung der Tests (z. B. Unit-Tests, Integrationstests, …) mit JUnit
30.1.2. Phase 1: Installation & Vorbereitungs-Check
Bevor gestartet wird, muss überprüft werden, ob openspec auf dem Entwicklungsrechner installiert ist.
|
Die Installation und Ausführung von |
# Überprüfen, ob openSpec global installiert ist
openspec --version
Sollte das Tool nicht installiert sein, kann es mit folgendem Befehl global installiert werden:
npm install -g @fission-ai/openspec@latest30.1.3. Phase 2: Der openSpec-Workflow (Delta-Specs)
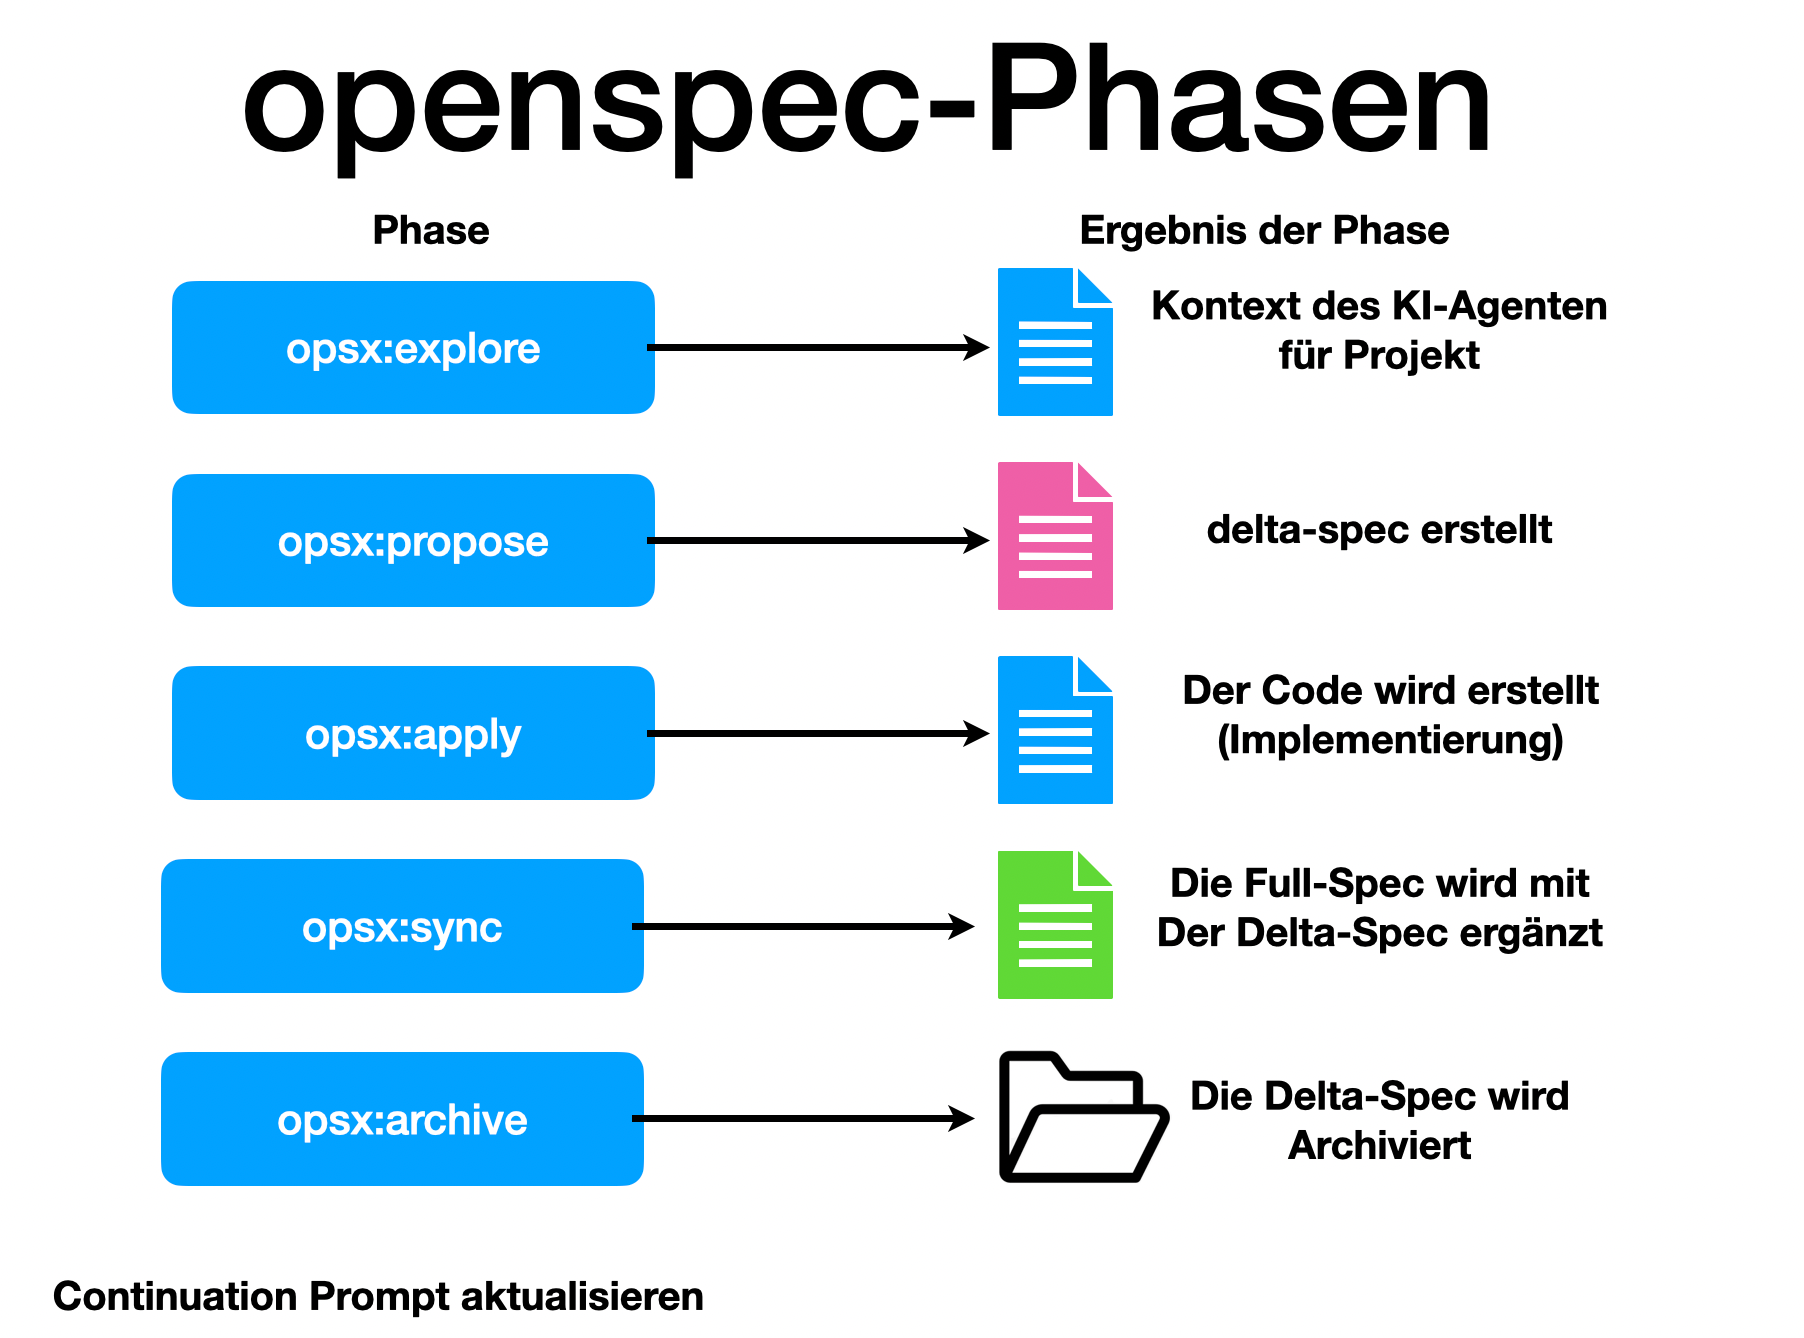
Der Entwicklungsprozess wird über vordefinierte Phasen gesteuert, die als Befehle in den Chat eingegeben werden. Jedes Feature durchläuft diese Phasen als Spec-Delta.
|
Kein sofortiger Code-Start! Der AI-Agent darf nicht sofort mit der Implementierung beginnen. Zuerst wird die Spezifikation erstellt, verfeinert und im Detail mit dem Entwickler besprochen. Erst nach der expliziten Freigabe des Proposals durch den Entwickler startet die Umsetzung. Das stellt sicher, dass die Anforderungen präzise definiert sind und Missverständnisse vor dem Schreiben von Code ausgeräumt werden. |
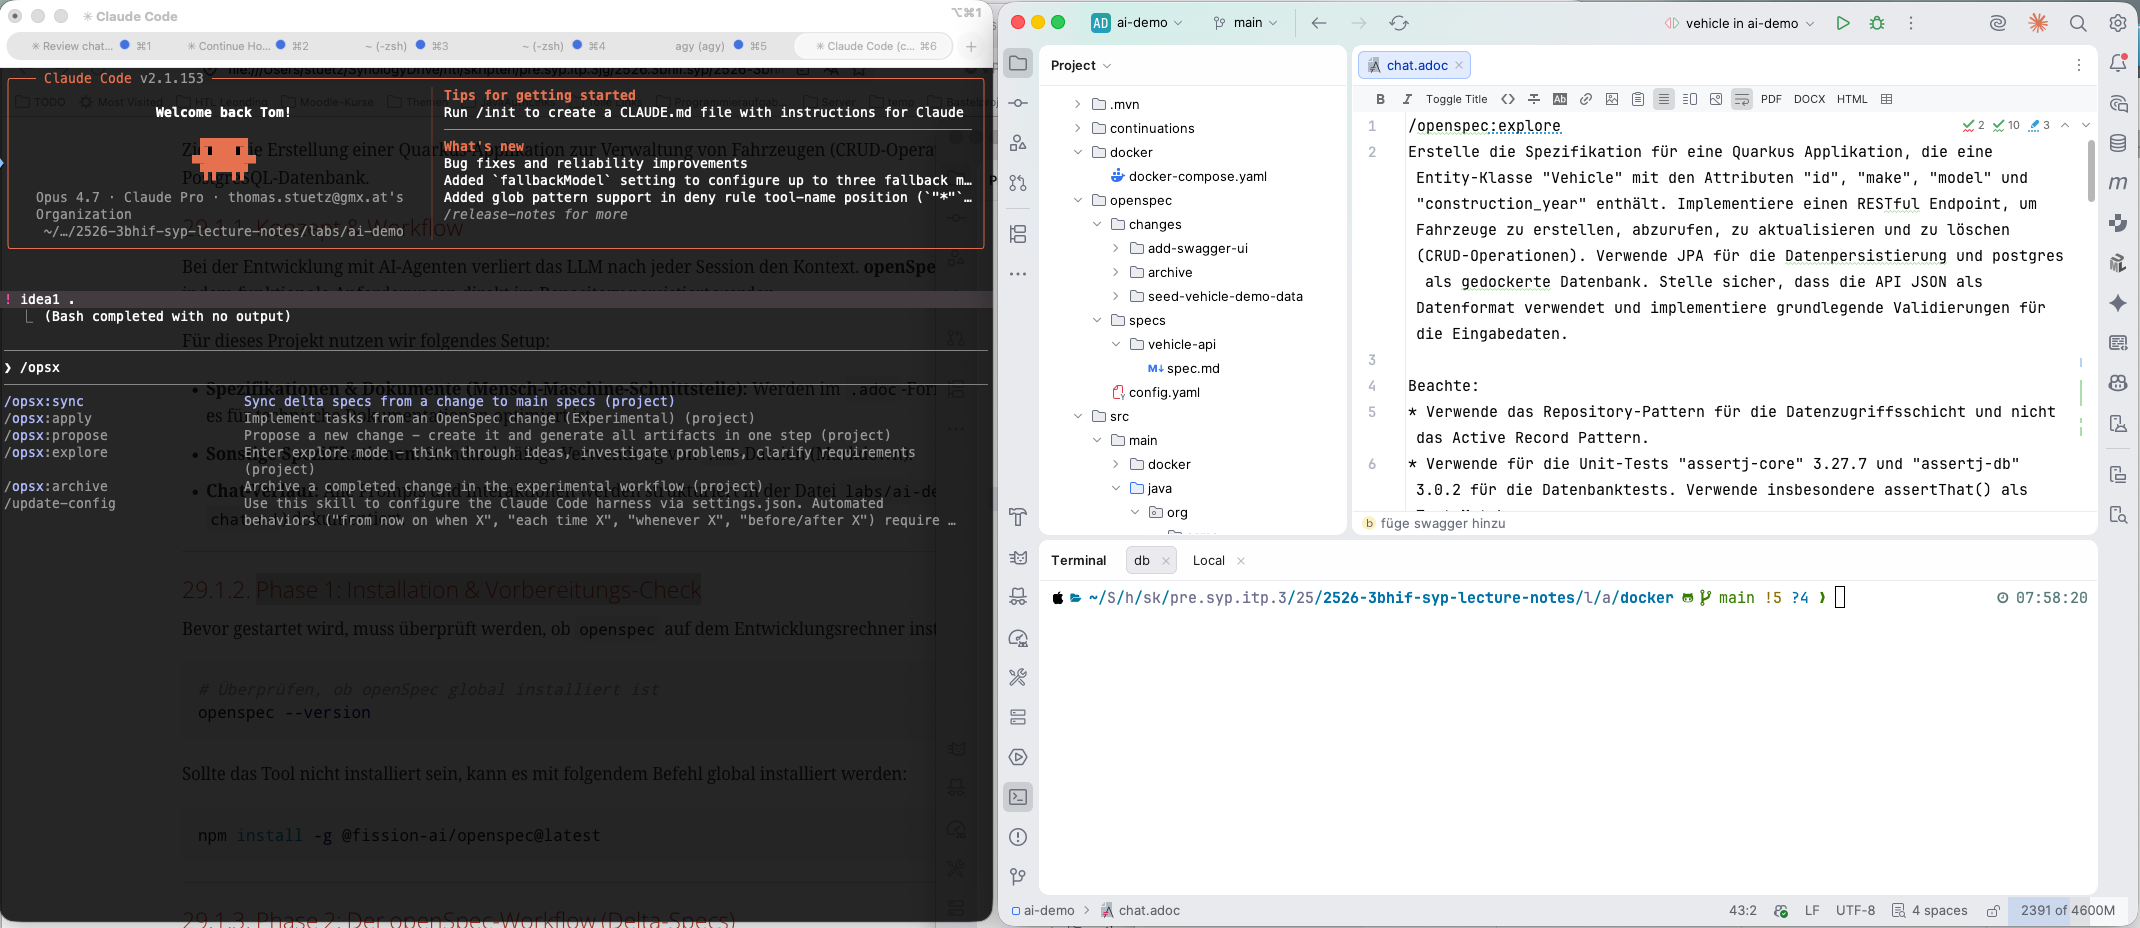
1. /opsx:explore
In dieser Phase analysiert der AI-Agent den aktuellen Zustand des Projekts, liest bestehende Anforderungen und verschafft sich den notwendigen Kontext.
/opsx:explore
Erstelle die Spezifikation für eine Quarkus Applikation, die eine Entity-Klasse "Vehicle" mit den Attributen "id", "make", "model" und "construction_year" enthält. Implementiere einen RESTful Endpoint, um Fahrzeuge zu erstellen, abzurufen, zu aktualisieren und zu löschen (CRUD-Operationen). Verwende JPA für die Datenpersistierung und postgres als gedockerte Datenbank. Stelle sicher, dass die API JSON als Datenformat verwendet und implementiere grundlegende Validierungen für die Eingabedaten.
2. /opsx:propose
Der Agent erstellt ein Proposal (Änderungsvorschlag) unter changes/ mit dem geplanten Vorgehen und dem Spec-Delta.
Review & Abstimmung: Der Entwickler prüft dieses Proposal sorgfältig und diskutiert es bei Bedarf mit dem Agenten. Dies ist das wichtigste Kontrollorgan, um sicherzustellen, dass keine Fehlentwicklungen stattfinden.
3. /opsx:apply
Nach der Freigabe des Proposals (Freigabe des Spec-Deltas und des Umsetzungsplans) durch den Entwickler beginnt die eigentliche Implementierung. Der Agent schreibt den Java-Code, die Konfigurationsdateien und die Docker-Compose-Konfiguration.
4. /opsx:sync
In dieser Phase wird überprüft, ob die Implementierung exakt mit den Spezifikationen übereinstimmt und alle Tests grün sind. Dabei wird die Gesamtspezifikation um die jeweilige Delta-Spezifikation (Spec-Delta) erweitert, wodurch eine konsistente und vollständige Spezifikation des Gesamtsystems entsteht.
5. /opsx:archive
Die abgeschlossenen Änderungen werden in die lebende Spezifikation übernommen und der temporäre changes/-Ordner wird aufgeräumt.
6. Erstellung eines Continuation Prompts
Um bei einer neuen Session sofort wieder produktiv starten zu können, wird im Ordner continuations/ ein Continuation Prompt erstellt. Bei einem Neustart kann der Kontext über /clear gelöscht und der Continuation-Prompt eingelesen werden, was Token spart und Fehlinterpretationen verhindert.
update the continuation prompt in folder "continuations"7. commit und push
Die Schritte commit und push werden nach der Erstellung bzw. dem Update des Continuation Prompts durchgeführt. Dadurch werden alle Änderungen – einschließlich des aktualisierten Continuation Prompts – direkt im Repository gesichert. Dies ermöglicht eine lückenlose Nachverfolgung der Änderungen und stellt sicher, dass Spezifikationen, Implementierungen und Continuation Prompts im Repository stets auf dem neuesten Stand und konsistent sind.
Wenn der Entwickler dem Agenten den Befehl erteilt, die Änderungen zu committen, vergibt der Agent selbstständig oft sehr präzise und sinnvolle Commit-Messages (z. B. nach dem Conventional Commits Standard), die den tatsächlichen Änderungsumfang beschreiben. Auch das Pushen der Änderungen auf das Remote-Repository wird direkt vom AI-Agenten ausgeführt.
commitpush30.1.4. Phase 3: Technische Implementierung
Im Folgenden sind die Kernkomponenten des erstellten Quarkus-Projekts detailliert aufgeführt.
Technische Implementierungsdetails einblenden
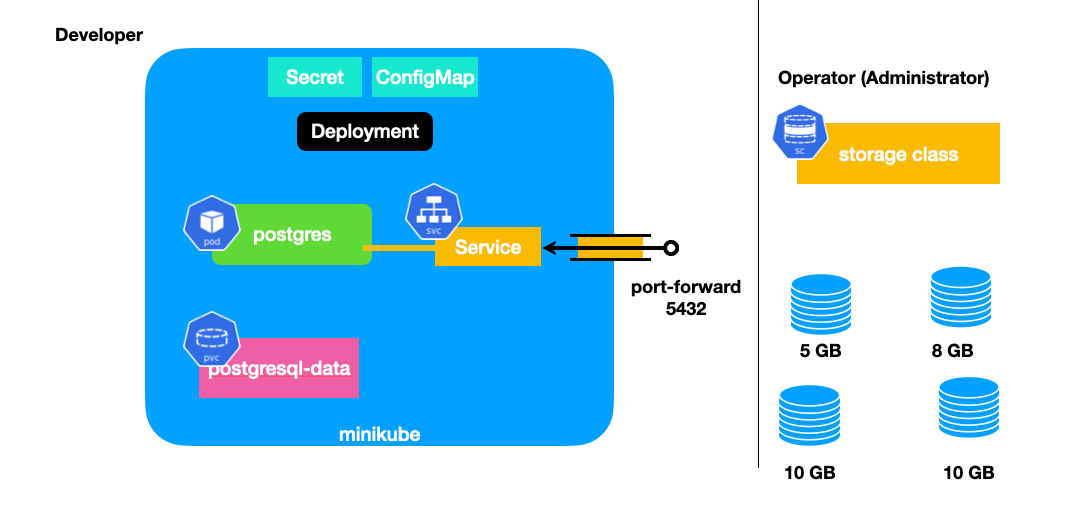
=== 1. Docker-Datenbank-Konfiguration (docker/docker-compose.yaml)
Die PostgreSQL-Datenbank läuft in Version 18 in einem Docker-Container.
services:
  postgres:
    image: postgres:18
    container_name: postgres-db
    environment:
      POSTGRES_DB: db
      POSTGRES_USER: app
      POSTGRES_PASSWORD: app
    ports:
      - "5432:5432"
    volumes:
      - pgdata:/var/lib/postgresql

volumes:
  pgdata:
=== 2. JPA-Entity-Klasse (Vehicle.java)
Die Entity-Klasse verwendet spezifische Tabellen- und Spaltenpräfixe (AI_ bzw. V_) und Validierungs-Annotations sowie OpenAPI-Metadaten.
package org.acme.vehicle.entity;

import jakarta.persistence.Column;
import jakarta.persistence.Entity;
import jakarta.persistence.GeneratedValue;
import jakarta.persistence.GenerationType;
import jakarta.persistence.Id;
import jakarta.persistence.SequenceGenerator;
import jakarta.persistence.Table;
import jakarta.validation.constraints.Min;
import jakarta.validation.constraints.NotBlank;
import jakarta.validation.constraints.NotNull;
import org.eclipse.microprofile.openapi.annotations.media.Schema;

@Entity
@Table(name = "AI_VEHICLE")
@Schema(description = "A vehicle record")
public class Vehicle {

    @Id
    @GeneratedValue(strategy = GenerationType.SEQUENCE, generator = "vehicle_seq")
    @SequenceGenerator(name = "vehicle_seq", sequenceName = "vehicle_id_seq", allocationSize = 1)
    @Column(name = "V_ID")
    @Schema(readOnly = true, example = "1", description = "Server-generated primary key")
    private Long id;

    @NotBlank(message = "Make must not be blank")
    @Column(name = "V_MAKE", nullable = false)
    @Schema(example = "Volkswagen", description = "Manufacturer of the vehicle", required = true)
    private String make;

    @NotBlank(message = "Model must not be blank")
    @Column(name = "V_MODEL", nullable = false)
    @Schema(example = "Golf VII", description = "Model designation", required = true)
    private String model;

    @NotNull(message = "Construction year must not be null")
    @Min(value = 1886, message = "Construction year must be 1886 or later")
    @Column(name = "V_CONSTRUCTION_YEAR", nullable = false)
    @Schema(example = "2015", description = "Year the vehicle was manufactured (>= 1886)", required = true)
    private Integer construction_year;

    public Vehicle() {
    }

    public Vehicle(String make, String model, Integer construction_year) {
        this.make = make;
        this.model = model;
        this.construction_year = construction_year;
    }

    // Getter and Setter
    public Long getId() { return id; }
    public void setId(Long id) { this.id = id; }
    public String getMake() { return make; }
    public void setMake(String make) { this.make = make; }
    public String getModel() { return model; }
    public void setModel(String model) { this.model = model; }
    public Integer getConstruction_year() { return construction_year; }
    public void setConstruction_year(Integer construction_year) { this.construction_year = construction_year; }
}
=== 3. Repository-Schicht (VehicleRepository.java)
Zur Datenabfrage wird das Repository-Pattern (über PanacheRepository) und nicht das Active-Record-Pattern verwendet.
package org.acme.vehicle.repository;

import io.quarkus.hibernate.orm.panache.PanacheRepository;
import jakarta.enterprise.context.ApplicationScoped;
import org.acme.vehicle.entity.Vehicle;

@ApplicationScoped
public class VehicleRepository implements PanacheRepository<Vehicle> {
}
=== 4. REST-Endpoint (VehicleResource.java)
Der RESTful Endpoint ist unter /api/vehicles erreichbar und stellt CRUD-Operationen unter Verwendung von JSON bereit.
package org.acme.vehicle.resource;

import jakarta.inject.Inject;
import jakarta.transaction.Transactional;
import jakarta.validation.Valid;
import jakarta.ws.rs.*;
import jakarta.ws.rs.core.MediaType;
import jakarta.ws.rs.core.Response;
import jakarta.ws.rs.core.Response.Status;
import java.net.URI;
import java.util.List;
import org.acme.vehicle.entity.Vehicle;
import org.acme.vehicle.repository.VehicleRepository;
import org.eclipse.microprofile.openapi.annotations.Operation;
import org.eclipse.microprofile.openapi.annotations.responses.APIResponse;
import org.eclipse.microprofile.openapi.annotations.tags.Tag;

@Path("/api/vehicles")
@Produces(MediaType.APPLICATION_JSON)
@Consumes(MediaType.APPLICATION_JSON)
@Tag(name = "Vehicles", description = "CRUD operations on vehicles")
public class VehicleResource {

    @Inject
    VehicleRepository repository;

    @GET
    @Operation(summary = "List all vehicles")
    @APIResponse(responseCode = "200", description = "Array of vehicles")
    public List<Vehicle> list() {
        return repository.listAll();
    }

    @GET
    @Path("/{id}")
    @Operation(summary = "Get a vehicle by ID")
    @APIResponse(responseCode = "200", description = "Vehicle found")
    @APIResponse(responseCode = "404", description = "Vehicle not found")
    public Response get(@PathParam("id") Long id) {
        return repository.findByIdOptional(id)
                .map(vehicle -> Response.ok(vehicle).build())
                .orElseGet(() -> Response.status(Status.NOT_FOUND).build());
    }

    @POST
    @Transactional
    @Operation(summary = "Create a vehicle")
    @APIResponse(responseCode = "201", description = "Vehicle created")
    public Response create(@Valid Vehicle vehicle) {
        repository.persist(vehicle);
        return Response.created(URI.create("/api/vehicles/" + vehicle.getId()))
                .entity(vehicle)
                .build();
    }

    @PUT
    @Path("/{id}")
    @Transactional
    @Operation(summary = "Update an existing vehicle")
    public Response update(@PathParam("id") Long id, @Valid Vehicle updatedVehicle) {
        return repository.findByIdOptional(id)
                .map(vehicle -> {
                    vehicle.setMake(updatedVehicle.getMake());
                    vehicle.setModel(updatedVehicle.getModel());
                    vehicle.setConstruction_year(updatedVehicle.getConstruction_year());
                    return Response.ok(vehicle).build();
                })
                .orElseGet(() -> Response.status(Status.NOT_FOUND).build());
    }

    @DELETE
    @Path("/{id}")
    @Transactional
    @Operation(summary = "Delete a vehicle")
    public Response delete(@PathParam("id") Long id) {
        boolean deleted = repository.deleteById(id);
        if (deleted) {
            return Response.noContent().build();
        } else {
            return Response.status(Status.NOT_FOUND).build();
        }
    }
}
=== 5. Quarkus-Konfiguration (src/main/resources/application.properties)
Die Anbindung an die PostgreSQL-Datenbank und die Aktivierung von Swagger UI für die interaktive Dokumentation.
# Datasource configuration
quarkus.datasource.db-kind=postgresql
quarkus.datasource.username=app
quarkus.datasource.password=app
quarkus.datasource.jdbc.url=jdbc:postgresql://localhost:5432/db

# Hibernate ORM configuration
quarkus.hibernate-orm.database.generation=drop-and-create
quarkus.hibernate-orm.log.sql=true
quarkus.hibernate-orm.sql-load-script=no-file
%dev.quarkus.hibernate-orm.sql-load-script=import.sql

# OpenAPI / Swagger UI
quarkus.swagger-ui.always-include=true
quarkus.smallrye-openapi.info-title=Vehicle API
quarkus.smallrye-openapi.info-version=1.0.0
=== 6. SQL-Initialisierung (src/main/resources/import.sql)
Hier werden Standard-Testdaten beim Start im %dev-Profil geladen:
INSERT INTO AI_VEHICLE (V_ID, V_MAKE, V_MODEL, V_CONSTRUCTION_YEAR) VALUES (1, 'Volkswagen', 'Golf VII', 2015);
INSERT INTO AI_VEHICLE (V_ID, V_MAKE, V_MODEL, V_CONSTRUCTION_YEAR) VALUES (2, 'BMW', 'M3 E46', 2003);
INSERT INTO AI_VEHICLE (V_ID, V_MAKE, V_MODEL, V_CONSTRUCTION_YEAR) VALUES (3, 'Tesla', 'Model 3', 2022);
ALTER SEQUENCE vehicle_id_seq RESTART WITH 100;
30.1.5. Phase 4: Validierung & Testing
Die Qualitätssicherung erfolgt über zwei Arten von Tests, wobei Assertions konsequent mit assertThat() durchgeführt werden.
Validierungs- und Testing-Details einblenden
=== 1. Integrationstest der REST-API mit REST-Assured (VehicleResourceTest.java)
package org.acme.vehicle.resource;

import static io.restassured.RestAssured.given;
import static org.assertj.core.api.Assertions.assertThat;

import io.quarkus.test.junit.QuarkusTest;
import io.restassured.http.ContentType;
import io.restassured.response.Response;
import org.acme.vehicle.entity.Vehicle;
import org.junit.jupiter.api.MethodOrderer;
import org.junit.jupiter.api.Order;
import org.junit.jupiter.api.Test;
import org.junit.jupiter.api.TestMethodOrder;

@QuarkusTest
@TestMethodOrder(MethodOrderer.OrderAnnotation.class)
public class VehicleResourceTest {

    private static Long createdId;

    @Test
    @Order(1)
    public void testCreateVehicle() {
        Vehicle vehicle = new Vehicle("Tesla", "Model S", 2022);

        Response response = given()
                .contentType(ContentType.JSON)
                .body(vehicle)
                .when()
                .post("/api/vehicles")
                .then()
                .statusCode(201)
                .extract()
                .response();

        Vehicle created = response.as(Vehicle.class);
        assertThat(created).isNotNull();
        assertThat(created.getId()).isNotNull();
        assertThat(created.getMake()).isEqualTo("Tesla");

        createdId = created.getId();
    }

    @Test
    @Order(2)
    public void testGetVehicle() {
        Response response = given()
                .when()
                .get("/api/vehicles/" + createdId)
                .then()
                .statusCode(200)
                .extract()
                .response();

        Vehicle vehicle = response.as(Vehicle.class);
        assertThat(vehicle.getMake()).isEqualTo("Tesla");
    }

    @Test
    @Order(3)
    public void testCreateValidationFail() {
        Vehicle invalid = new Vehicle("", "Model 3", 1800); // Fails due to blank make and year < 1886
        given()
                .contentType(ContentType.JSON)
                .body(invalid)
                .when()
                .post("/api/vehicles")
                .then()
                .statusCode(400);
    }
}
=== 2. Datenbank-Zustandstest mit AssertJ-DB (VehicleDatabaseTest.java)
Mit assertj-db wird der Zustand der Datenbank direkt geprüft, um sicherzustellen, dass Hibernate die Entitäten korrekt speichert.
package org.acme.vehicle.repository;

import io.quarkus.test.junit.QuarkusTest;
import jakarta.inject.Inject;
import jakarta.transaction.Transactional;
import javax.sql.DataSource;
import org.acme.vehicle.entity.Vehicle;
import org.assertj.db.type.AssertDbConnection;
import org.assertj.db.type.AssertDbConnectionFactory;
import org.assertj.db.type.Table;
import static org.assertj.db.api.Assertions.assertThat;
import org.junit.jupiter.api.Test;

@QuarkusTest
public class VehicleDatabaseTest {

    @Inject
    DataSource dataSource;

    @Inject
    VehicleRepository repository;

    @Test
    @Transactional
    public void testDatabaseState() {
        AssertDbConnection connection = AssertDbConnectionFactory.of(dataSource).create();

        Table table = connection.table("AI_VEHICLE").build();
        int initialRows = table.getRowsList().size();

        Vehicle vehicle = new Vehicle("Audi", "A4", 2021);
        repository.persistAndFlush(vehicle);

        Table updatedTable = connection.table("AI_VEHICLE").build();

        assertThat(updatedTable)
                .hasNumberOfRows(initialRows + 1)
                .row(initialRows)
                .value("V_MAKE").isEqualTo("Audi")
                .value("V_MODEL").isEqualTo("A4")
                .value("V_CONSTRUCTION_YEAR").isEqualTo(2021);

        repository.delete(vehicle);
    }
}
30.1.6. Phase 5: Starten des Projekts
# 1. Terminal: Docker-Datenbank starten
cd labs/ai-demo/docker
docker compose up -d

# 2. Terminal: Quarkus-App im Dev-Modus starten
cd labs/ai-demo
./mvnw clean quarkus:dev-
Die API ist erreichbar unter:
http://localhost:8080/api/vehicles -
Swagger UI ist im Dev-Modus erreichbar unter:
http://localhost:8080/q/swagger-ui/
30.1.7. Konvertierung in das AsciiDoc-Format (.adoc)
|
Obwohl in diesem Projekt alle Spezifikationen standardmäßig im |
Noch offen:
-
Welche Sprache soll verwendet werden?
-
deutsch vs englisch
-
-
Wie werden Skills erstellt?
-
Aufgaben im Hintergrund
31. 2026-06-16
31.2. The Ralph-Loop
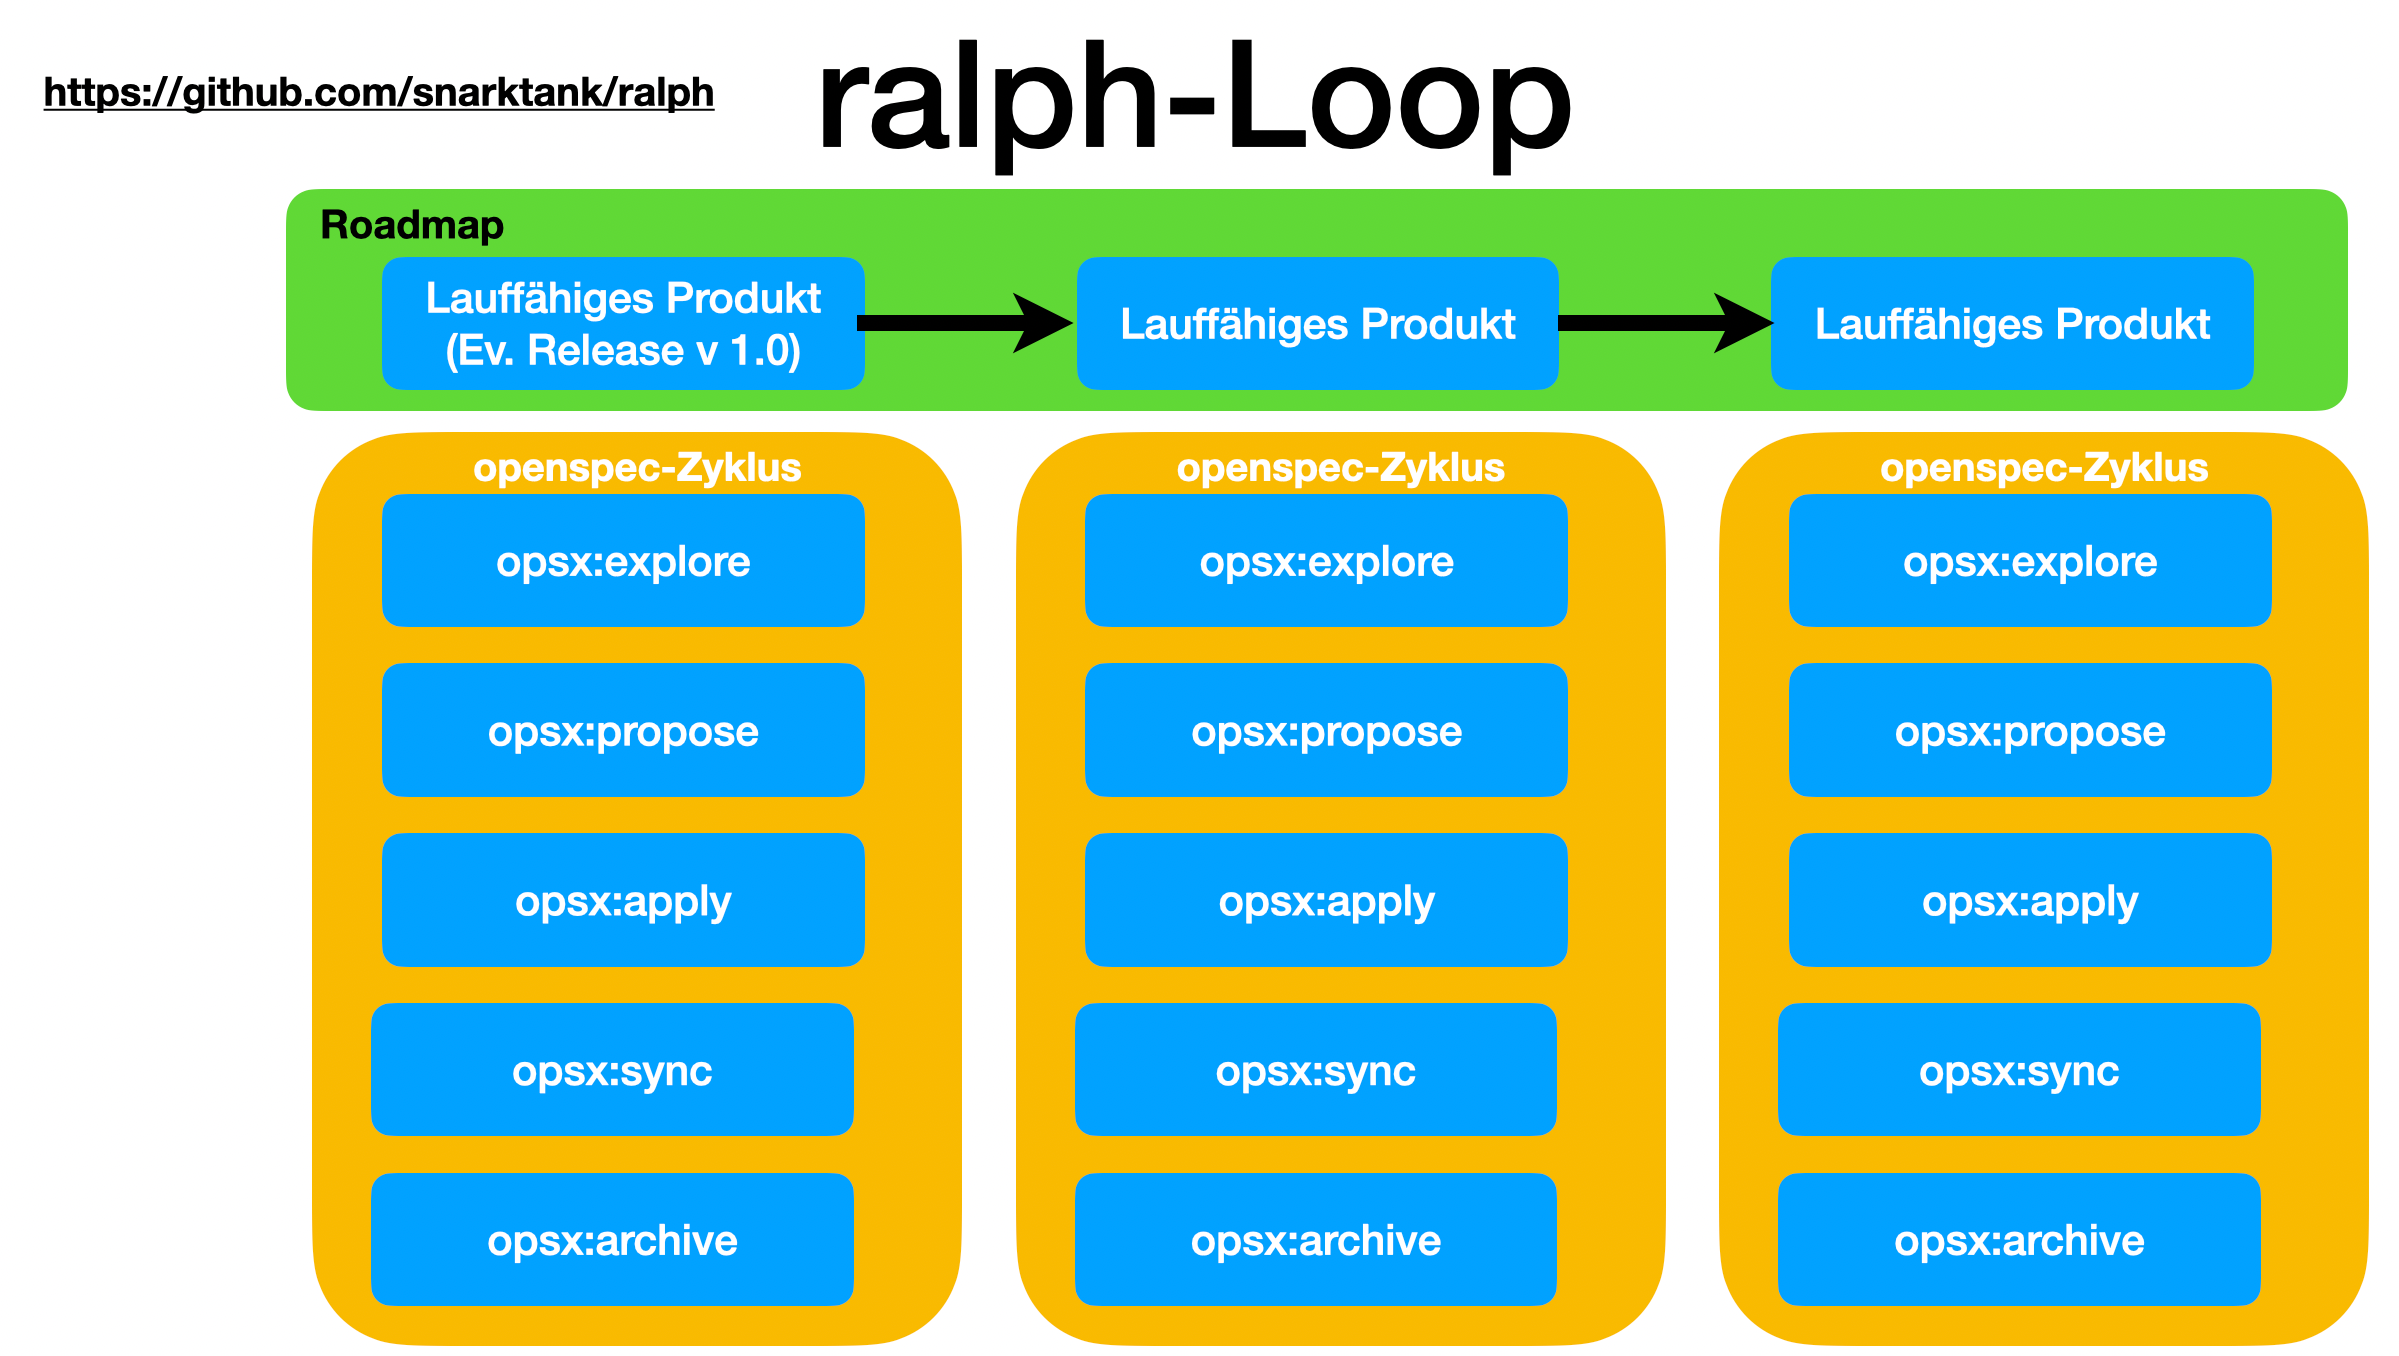
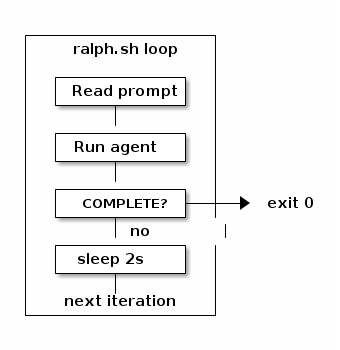
31.2.1. Overview
Ralph (snarktank/ralph) is a simple but clever agentic loop — a bash script that repeatedly runs an AI coding agent (Claude Code or Amp) until the task is done or a maximum iteration count is reached.
31.2.2. How the Loop Works
Each iteration follows the same steps:
-
Read a prompt — the agent reads
prompt.mdorCLAUDE.md, which describes the current task or PRD -
Run the AI agent — executes with full permissions (
--dangerously-skip-permissions) and captures the output -
Check for completion — looks for a
<promise>COMPLETE</promise>signal in the output -
If not done — sleeps 2 seconds and starts the next iteration
-
Repeat — up to
MAX_ITERATIONS(default: 10)
for i in $(seq 1 $MAX_ITERATIONS); do
    OUTPUT=$(claude --dangerously-skip-permissions --print < "$SCRIPT_DIR/CLAUDE.md")

    if echo "$OUTPUT" | grep -q "<promise>COMPLETE</promise>"; then
        echo "Ralph completed all tasks!"
        exit 0
    fi

    sleep 2
done
31.2.3. Extra Features
- progress tracking
-
Appends agent output to a
progress.txtlog file across iterations. - branch-aware archiving
-
Detects Git branch changes and archives the previous run’s PRD and progress log automatically.
- multi-agent support
-
Supports both Claude Code and Amp as the underlying agent via the
--toolflag.
31.2.4. The Key Insight
The loop pattern solves a fundamental agent limitation: a single LLM call has a finite context window and time budget.
By running the agent repeatedly and letting it read its own progress file each iteration, Ralph enables long-running tasks that span multiple agent sessions — the agent picks up where it left off.
|
The file system acts as shared memory between iterations. The agent writes its state to disk; the next iteration reads it back. |
It is essentially a persistent outer loop around a stateless agent:
31.4. Tmux
31.4.1. Managing Remote AI Agents with tmux
Running CLI-based AI agents like claude-code or antigravity-cli on a remote server requires a stable environment. If your SSH connection drops during a long-running code generation task, the process dies.
Using tmux (Terminal Multiplexer) solves this problem by keeping your session alive on the server, even if your local machine disconnects.
31.4.2. Starting or Rejoining an AI Agent Session
To connect to your remote server and either start a new dedicated AI session or instantly resume an existing one, run this optimized SSH command from your local terminal:
ssh myname@192.168.1.xx -t "tmux attach -t ai-agent || tmux new -s ai-agent"-
attach -t ai-agent: Attempts to reconnect to a running session named ai-agent. -
|| tmux new -s ai-agent: If no session exists, the||(OR) operator triggers the creation of a brand new session with that name.
Once inside, you can safely launch your agent:
claude-code31.4.3. Essential Session Control Controls
While inside tmux, all commands are preceded by the prefix shortcut Ctrl+b.
| Action | Key Combination / Command |
|---|---|
Detach (Leave agent running in background) |
Press |
Kill current window/pane |
Press |
Interactively switch sessions |
Press |
31.4.4. Managing Sessions from the Outside
If you are logged into the server normally (outside of tmux) and want to check on or terminate your AI processes, use the following management commands.